9.13 More About Ruler Lanes
Multiple ruler lanes can be helpful for all but the simplest of projects.
Kind: concept (user-guide-section) Chapter: 9 Tempo Based Production, Loops, Markers and Regions Source: REAPER User Guide v7.70
Multiple ruler lanes can be helpful for all but the simplest of projects. They make managing your project’s regions and markers simpler and easier. Consider the example shown below.

This example project is really not complex, yet even here we can see that by using multiple lanes our project structure is much easier to understand, organise and manage via the ruler. Lanes can be created in either the Region/Marker Manager or the Ruler Lane Manager. Let’s assume, using the example in this section that we need to have three lanes – Verses, Choruses and Solos.
To create a new ruler lane from the Region/Marker Manager:
- Open the Ruler Lane Manager (click on Lane Manager button). The Rule Lane Manager can also be opened directly from the View menu. 2. In Ruler Lane Manager window, click Add Lane button, then Add Region Lane or Add Marker Lane. 3. By default new lanes are numbered in sequence (e.g. 1, 2, 3, etc). To name it, double click in the Lane Name column, type lane name and press Enter.
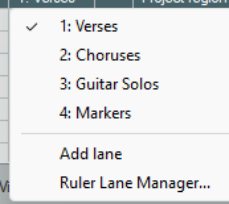
To assign regions to lanes from the Region/Marker Manager:
- Use the Name column to select the required tab row. 2. Double-click in the Ruler Lane column to display a menu -as shown right. 3. Choose an existing lane from the menu, or choose Add Lane to create a new one. Note: Regions can also be moved from one lane to another using drag and drop. Further lane management features can be found in Ruler Lane manager window.