5.12 Understanding Sends, Buses, Submixes and Folders
You have already seen that each of the tracks in your projects has its audio output routed by default to the master, and that from here the audio signal is directed to your preferred output device or devices, such as….
Kind: concept (user-guide-section) Chapter: 5 Project Arrangement Basics Source: REAPER User Guide v7.70
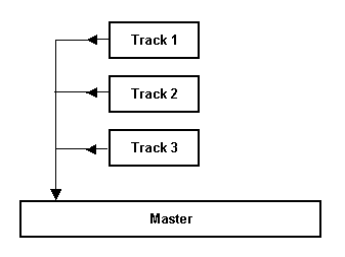
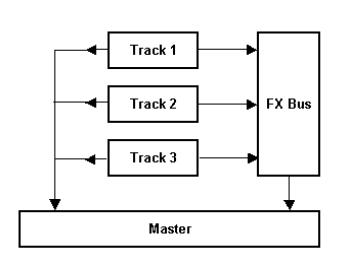
You have already seen that each of the tracks in your projects has its audio output routed by default to the master, and that from here the audio signal is directed to your preferred output device or devices, such as speakers or headphones. The signal flow that occurs here within REAPER can be represented by the first diagram on the right, which shows a simple project with just three tracks. In Chapter2 you were shown how to use a track as an effects bus, for example to add the same reverb effect to a number of tracks. The signal flow for this arrangement can be represented by the second flow chart (below right).
Each track’s send carries a signal to the bus track which applies the effect, and then sends the processed (wet) signal on to the Master. As long as the Send Master/Parent option remains enabled, the dry signal for each track is also sent directly to the master. Here it is finally mixed together with the “wet” signal from the bus before being directed to your speakers and/or headphones. These two examples use routing arrangements that you would find in most DAW programs. However, we are now about to enter territory where REAPER may be substantially different from other software that you may have used before. This concerns how you can create and use submixes. With most programs, to create a submix (perhaps for drum tracks or vocal harmonies) you will need to create a bus, add sends from each track that is to be included in the submix, and then disable the direct sends to the master from each of these tracks.
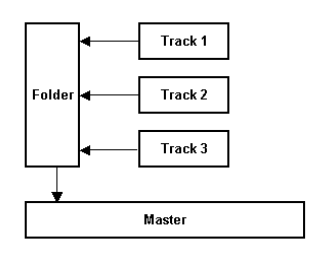
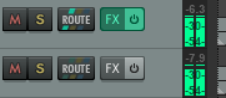
You can use this method in REAPER. Holding Alt while clicking on a track's ROUTE button toggles on and off the direct send to the master. If output to the master is enabled the first of the stripes on the ROUTE button is colored. If disabled, it is gray. This distinction is shown here. In the first track, the output from the track to the master is enabled, in the second track, it has been disabled. However, a smarter and potentially more powerful way of creating a submix is to use folders (sometimes called track folders). We'll look at how this is done shortly. A folder track is created initially in the same way as any other track. You then tell REAPER to treat this as a folder track - and essentially that's it. You now have your submix (as shown here on the right). Direct output to the master from the individual “child” tracks within the folder is automatically disabled. Instead, they are passed thru the folder. You should not manually disable the master/parent send for child tracks within a folder, or their output will no longer go to the folder track. Anything that you do to the folder will be done to the entire submix. For example, if you adjust the volume up or down, the volume of the submix will be adjusted up or down. If you add an effect such as a compressor to the folder then that effect will be applied to the submix.
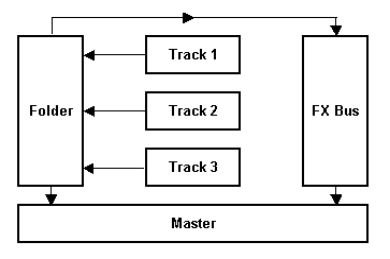
Before we see exactly how a folder and its child tracks are set up, there's one more scenario to consider. Even when you have a folder which contains a submix of other tracks, you can still use buses for the folder itself or for individual tracks inside the folder (see right). In this case our folder (submix) still consists of the same three tracks as before. In addition, however, a send has been created from the folder to an FX bus, perhaps to add reverb to the submix. We'll see an example of this soon. There are three types of send – Post-Fader (Post Pan), Pre-Fader (Post FX) and Pre FX. These are explained in Chapter 17 and illustrated by the flow charts at the end of Chapter 6. For the time being, accept the default option, Post-Fader (Post Pan).