9.11 Custom Ruler Region Lanes
With custom ruler lanes you can create multiple region lanes, and specify which regions are to be displayed in which lane.
Kind: concept (user-guide-section) Chapter: 9 Tempo Based Production, Loops, Markers and Regions Source: REAPER User Guide v7.70

With custom ruler lanes you can create multiple region lanes, and specify which regions are to be displayed in which lane. A simple example is shown here. You can also display and hide the lanes as you wish. In the example above, if you wished to work closely on your Sax Solo tracks and Choruses, you can temporarily hide all lanes except for these. To manage your lanes you need to open the Ruler Lane Manager window (shown right). To do this, click on the Lane Manager button in the Region/Marker Manager window, or use View, Ruler Lane Manager from the main menu. Here the first column can be used to change the color of all markers/regions in that lane.

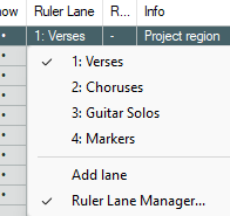
Note that the options Collapse lanes when ruler is too small and Resize ruler when lane count changes are applied on a per project basis. Use the Add Lane button to add a marker lane or region lane or to your ruler. By default, these will be numbered !, 2, 3 etc., but (as shown above) you can enter a more meaningful name in the Lane Name column. Duplicate Lane will duplicate whatever lane is currently selected. Use the Visible column to toggle a lane’s display on the ruler on and off. Markers and regions can be assigned to lanes in the Region/Marker Manager. Double-click in the Ruler Lane column for the required marker or region row and select from the popup menu (for example, see right). This menu also gives you the option of creating a new lane for this region.
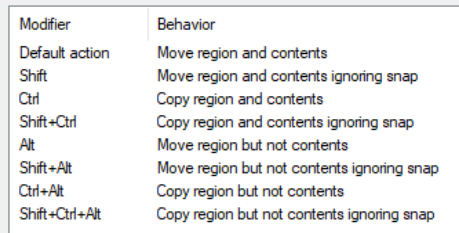
The default left drag mouse modifiers for working with project regions on the ruler are as shown on the left. Note in particular that you can drag lane names up or down to change the order in which lanes are displayed on the ruler. Go to Options, Preferences, Mouse Modifiers, Region then Left drag to edit. The Ruler Lane Left drag context includes a number of handy options. For example, the default action is to Hand Scroll. Shift left drag will Add a marker and Alt left drag will Draw a region. The Ruler lane header context Double click section also contains several handy shortcuts, including Double click to Select all regions/markers in lane. Ctrl-double-click to Toggle selection for all regions/markers in lane and Alt double click to Delete lane, keep regions/markers.