20.9 REAPER Video Settings and Preferences
Pressing Alt Enter displays the project settings dialog.
Kind: concept (user-guide-section) Chapter: 20 Using REAPER with Video Source: REAPER User Guide v7.70
Pressing Alt Enter displays the project settings dialog. Select the Video tab. You can select a frame rate from the drop down list, or type in your own value. Optionally, you may enter a preferred video size if you wish. If this is left blank, the video will try to size to the active media being played. If your project has videos all recorded at the same dimensions, setting this is unnecessary. If you have various videos at different resolutions, it can be advantageous to specify a size here. If you provide only a width or a height, it will adjust the other value to put things at a default 16:9 ratio. Video item visibility determines the order in which video items are processed. Items in lower numbered tracks replace higher is consistent with the approach taken by most video editing programs, but you can select Items in higher numbered tracks replace lower if you wish. Options for video colorspace are auto, 1420/YV12, YUY2 or RGB. Both YUY2 and 1420/YV12 store data more efficiently than RGB and offer an almost lossless form of file compression (but see comments below). The Video processor automation determines whether automation is to be evaluated at the start of the frame or in the middle of the frame. There are also options to allow you to choose whether or not video is to be affected by Solo state of other tracks and/or Muted parent tracks. Video colorspace options are Auto, 1420/YV12, YUY2 or RGB. Auto will ensure that whatever colorspace the media natively decodes will be used. Usually this is YV12. YV12 is the output mode used by most modern codecs (such as h264, or MPEG-4, or MPEG-2, or WEBM), and is usually the fastest because it can avoid colorspace conversions. YUY2 is similar to YV12 but is less-often used, and offers a little bit better color resolution (due to using less subsampling for luminance and chroma). Converting from YV12 to YUY2 is relatively inexpensive. YV12 and YUY2 are both YUV standards. RGBA is a completely different mode that matches the pixels on your screen. It is expensive to convert from YV12 or YUY2 to RGBA, and processing video frames in RGBA is also slower. Using RGBA also causes the chromakeyed blit functions (such as the chroma-key preset) to use a different algorithm, so it will look different. In fact, things will generally look slightly different in RGBA mode.
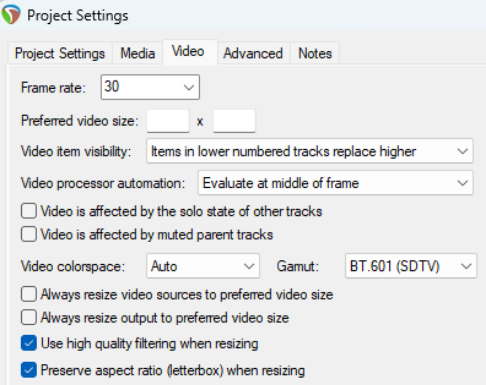
Other settings are toggles for the options Always resize video sources to preferred video size, Always resize output to preferred video size, Use high quality filtering when resizing, and Preserve aspect ratio (letterbox) when resizing. The option to Always resize video to preferred video size, if selected, will always resize the video if necessary prior to any processing. This can simplify use of certain FX, but also can be less efficient (since other FX can handle the resize natively as part of their own processing). The option to Always resize output to preferred video size, if selected, forces a resize if necessary at the output stage (meaning processing may happen at some other resolution, but at the end it is resized to the specified size for display). When rendering to a file, this option is is effectively selected, with the preferred width/ height set to the rendering width/height output. Shown below is the Options, Preferences, Media, Video window.
Output options are shown below that.
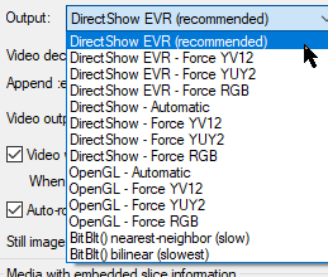
There is an option to open a window within Preferences to Show decoder information. You can, if you wish, edit the Video decoder priority list to change the order in which priority is allocated. By default, VLC format is assigned the highest priority. The option to specify Video output delay can be used if necessary to improve playback synchronization. This can be a small positive or negative amount. There is also an option to disable high-resolution peaks. Enabling the option Video window follows edits will synch the video window to the seek point when audio items are moved or resized. Still image thumbnails can be hidden or displayed in center/tile mode, full height mode or stretch/image
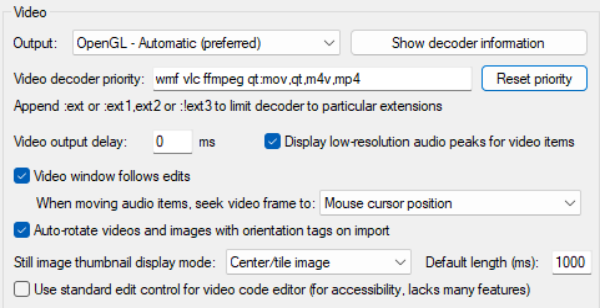
mode. You can also specify the default length for thumbnail images. There is also an option to use standard (accessible) OS editing control for video code. You can further choose your preferred behavior when audio items are moved, so that the video window displays content at the mouse cursor position, the start of the audio item, or a snap offset of the audio item. Note also an option to Auto-rotate videos and images with orientation tags on import.4 The Video file item properties dialog (accessed by choosing Source properties from the item context menu) includes options to Ignore audio and for handling Hi-res peaks. There is also an option to Copy audio settings to all video sources. In addition, the File, Render command can be used to export video from REAPER - see Chapter 21. Note also that the Performance meter includes an option to Display video load.
Video actions
REAPER’s Actions List includes two actions specifically relevant to video. Remember that if you wish you can assign your own keyboard shortcuts and/or toolbar icons for either or both of these:
Video: Show/hide video window (by default Ctrl Shift V) Video: Clear video cache/re-render frames