7.39 Spectrogram View and Spectral Editing
Spectrogram view shows you a visual representation of all of an item's sound frequencies as they vary through time, unlike spectral peaks which display only the dominant frequency .
Kind: concept (user-guide-section) Chapter: 7 Managing and Editing Media Items Source: REAPER User Guide v7.70
Spectrogram view shows you a visual representation of all of an item's sound frequencies as they vary through time, unlike spectral peaks which display only the dominant frequency . Spectrogram view can be turned on globally either by choosing Show spectrogram from the Options, Peaks display mode menu, or by selecting Spectrogram from the Peaks Display Settings window. This window will be examined in more detail shortly. Using this global option can, however, be resource intensive. You might wish to consider leaving this off, instead turning the option on only for media items as required, by choosing Spectral edits, Show spectrogram from the media item's right-click context menu. Spectral editing allows you to make edits to selected frequencies within an item, for example to remove breathing sounds or sibilance, whilst leaving other frequencies intact. Shortly, we'll look an example of how this can work in practise: first, a summary of its basics.
Defining an area within a media item for spectral editing.
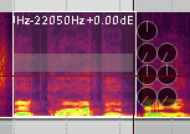
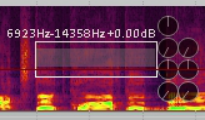
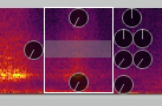
Make a time selection, then right click on the item and from the menu choose Spectral edits, Add spectral edits to item. A box will be drawn around the selected area of the item, as shown on the right. Click on the edge of a spectral edit item (or on the shaded bar that runs left to right across its center) to make its rotary controls visible. Drag the edges of the box left or right to increase or decrease the time selection. Drag up or down from the top or bottom to increase or decrease the frequency range. This can be done from the sides or the corners. An example of this is shown above left. Holding down Ctrl over any part of an edit item's top or bottom edge changes the
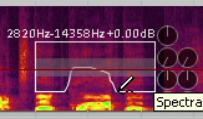
mouse cursor into a pencil. You can then make freehand changes to the item area by clicking and dragging. An example of this is shown on the right. Holding Alt over any part of an item's edge changes the mouse cursor to an X. You can use this (by dragging) to remove any freehand drawn edges, replacing them automatically with a straight line (or lines). Drag from the center of the item in any direction to move the selected area up or down (change frequency range) and/or left or right (change time selection). Let's now look at the eight rotary controls that operate on the selected area, located around the box. Moving clockwise from the 12 o’clock position, these are: High frequency fade: fades up or down the high frequencies. Works in conjunction with the Spectral region gain knob. Spectral region gain: fades up or down the gain level for the selected region. The next two knobs together act as a compressor on the selected area: threshold (left) and ratio (right) Moving threshold down to the left of the 12 o'clock position changes it into an expander. The next two knobs act as a gate on the selected area: threshold (left) and floor (right). Below that, the Spectral region fade out knob lets you control the rate at which the spectral edit item settings are faded out. At the bottom is the Low frequency Fade: the knob at 9 o’clock controls the rate of spectral edit fade in.
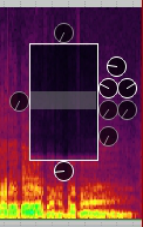
All buttons: Right-click over any button (or on the center bar) for a menu of options (below right) which include
Delete spectral edit (removes the spectral edit box, does not delete media). Bypass spectral edit and Solo spectral edit (for comparison). A submenu selects FFT size.
There is also an option in the Peak Display Settings to view both the peaks and the spectrogram, in parallel. Note: Spectral display is pre track FX but post take settings. For example, it reflects changes in pitch from the Item Properties dialog box or from a take pitch envelope, but not from a VST plug-in such as ReaPitch.
Example
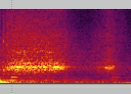
This picture (left) shows the vocal at the end of a line that ends with a “T” sound. The rightmost small shaded area represents an unpleasant “TT” where the singer has not let go of the word. If we mute or remove the whole area, we will create a hole. The trick is to find and remove only the unwanted part.
Throughout this process, we make use of the Bypass spectral edit and Solo spectral edit options during playback, for comparison purposes.
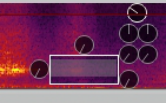
Introduce fades to both time and frequency selections.
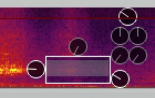
Now adjust area and lower gain until it sounds right.
First, add a spectral edit to the problem area.