12.6 The Project Media/FX Bay
The Project Media/FX Bay is a one stop center which you can use for managing and arranging a project's FX and media items.
Kind: concept (user-guide-section) Chapter: 12 Managing The Overall Project Source: REAPER User Guide v7.70
Overview
The Project Media/FX Bay is a one stop center which you can use for managing and arranging a project's FX and media items. It is opened from the main menu by the View, Project Media/FX Bay command. The window contains seven tabs (pages). The Item Groups (Chapter 7) and Take Comps (Chapter 8) tabs have already been introduced. Automation Items are explained in detail in Chapter 18. The others are:
-
Source Media. Lists media items available for use, or are already used in, the project. Each item will occur only once in this list. If used more than once, this is indicated in the Usage column.
-
Media Items. Lists only the items that are actually used in the project (i.e., active). An item will appear in this list as many times as it is used in the project.
-
FX and FX Parameters. Lists FX plug-ins used and FX parameters available in the project. The FX Parameters page is a “one stop shop” for managing any FX on any take or track within the project, for example to add envelopes or track controls, or assign control to an external device. These features are explained in the sections Managing FX Parameters and Using FX parameter MIDI Learn.
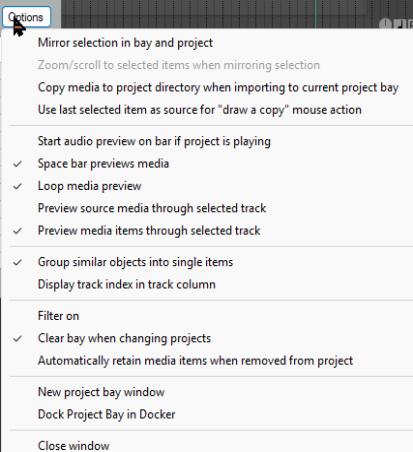
You can drag media files (e.g., from REAPER's Media Explorer or from Windows Explorer) or FX (e.g., from the FX browser) into the Project Bay. These media items are added to the Source Media page. If the item is then used in the project, it will be added to the Media Items page. FX items are added to the FX bay. Items within the Project Bay can be renamed, all instances of a media file or FX within the project can be selected: media/FX in the project can be replaced with any other media/FX from the Project Bay. You can also mute/solo media items and bypass/bypass FX. Media pages and the FX page include a Retain column. When you drag media items or FX into the project bay, they are marked with a + in the retain column. This setting means that the entry will remain in the project bay even if there are no instances of that media item or FX in the project. When you add media (by recording or inserting) to the project, they will appear as entries in the media items and source media bays, with the retain status unset. These entries will be automatically removed from the project bay if they are removed from the project itself. If you want the entries to remain in the project bay even after being removed from the project, you should enable retain for those entries in the source media bay. FX entries in the project bay include a Preset column. If you change the selected in this column (from the right-click menu), the change is applied to all instances of that FX in the project with the previous preset. In addition, you can retain an FX entry with a specific preset, or multiple entries for the same FX with different presets, in the project bay. The Project Bay includes the buttons Actions and Options. Clicking on either of these displays a menu. As an example, the Options menu is shown on the right. Most of these commands require little explanation.
Copy media to project directory when importing to
current project bay, This option can be turned on or off. Mirror selection in bay and project. This causes an item selected in the project to also be selected in the bay, and vice versa. You can also ensure that REAPER will zoom to a selected item when this option is enabled.
Use last selected item as source for “draw a copy”
mouse action. This enables you to use pencil mode to create copies of the last selected item. Space bar previews media allows use of the space bar to play the currently selected media or source media item. Loop media preview will allow any loop marked in the project to be applied. Preview (source or media items) through selected track allows you to play back the item with, for example, any FX in a particular track's FX chain, or any track envelopes, being applied. There is an option to Group similar FX into single items and another to Display the track index (i.e. track number) in the track column. The Filter can be set to use name, path or comment. Make sure the option Clear bay when changing projects is enabled if you wish to make each Project Bay project specific. Disable it if you want to carry over items in the current bay to the next project that you open or create. You also have the option to Automatically retain media items when they are removed from project. This ensures that retain status is automatically assigned when an item is removed from the project. The Dock project bay and Close window commands are self-explanatory. The commands on the Actions are shown right. They can be used with and applied to the items (media or FX) on whichever bay page is currently selected. New project bay window opens a new project bay window. You can use up to eight project bays in a single
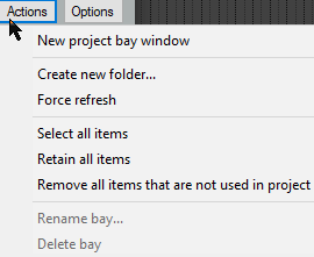
project. You can then use this (for example) to load a different saved project bay, whilst keeping the original bay open in the original window. This could be the case, for example, if you wish to sort/group media items into folders in more than one way. Create new folder. Individual project0 bay entries can be dragged and dropped in or out of the folder (see example below, where two folders have been created, Instruments and Vox). Folders can be used for source media items (as shown below), media items (in project) or FX. Double click left of the folder name to collapse or expand the folder. Force refresh forces a refresh of the project bay display. Select all items causes all items in the current tab to be selected. Retain all items causes all items in the current tab to be marked to be retained in the bay even when they are deleted from the project. Remove all items from project will remove all items from the project, and Remove all items that are not used in project will remove from the media bay all items that are not used in the project.
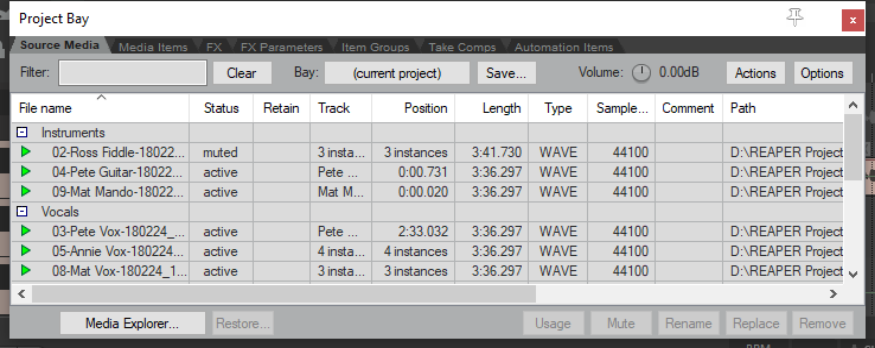
The Media Explorer button (lower left) can be used to open the Media Explorer, from where media items can be dragged and dropped into the project bay (as source media) or into the project itself. Complete (untrimmed) items can also be dragged and dropped directly from Windows Explorer. The rotary Volume control can be used to control the volume of any item being previewed when the option to preview thru selected track has been disabled. The Bay field serves three basic functions. You can use it to create a new project bay, to replace the contents of the current bay with a previously saved one, or to merge the contents of a previously saved project bay into the current one.