2.26 The Track Wiring View
Until now, there have been three main ways of managing track routing within REAPER, i.e. drag and drop in TCP or MCP view, using a track’s routing window.
Kind: concept (user-guide-section) Chapter: 2 REAPER Project Basics Source: REAPER User Guide v7.70
Until now, there have been three main ways of managing track routing within REAPER, i.e. drag and drop in TCP or MCP view, using a track’s routing window. Or using the Routing Matrix. Now you have a fourth option – Track Wiring. Track Wiring view cannot just be used to create routing: it also gives you an overview of your project’s routing, and allows you to manage it. For example, it can help you to identify any routing you may have created and forgotten about, but which needs to be deleted.
This section introduces you to Track Wiring and explores its environment. Track Wiring is accessed directly from the View menu. Let’s start with a simple example.

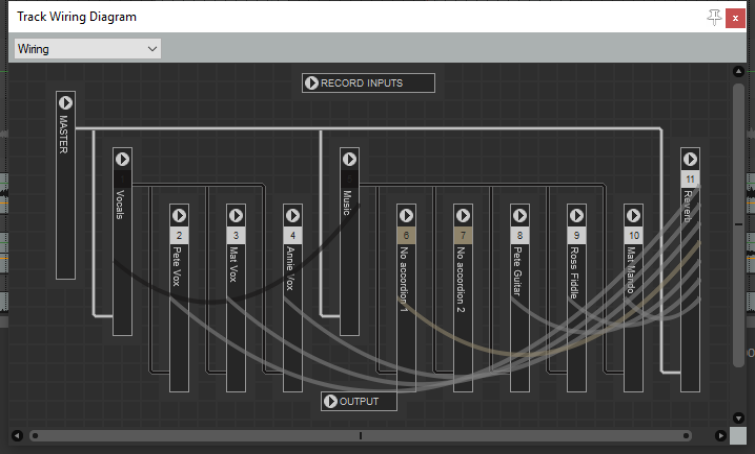
Above you see the track wiring view for a project with two recorded tracks and one reverb track.
-
The solid straight white lines depict sends to the master.
-
Click and hold on any track name to drag and drop it around at will.
-
The curved lines represent sends from one track to another (from each recorded track to the reverb track.
-
The little arrow next to the track number can be used to collapse/ expand the display of detailed track information for individual
tracks. This can be especially useful if your file has a large number of tracks and/or more complex routing (as shown in the second example above). Notice also how the two folders (Vocals and Music) and their child tracks are depicted.
In “normal” mode for each track the following overview information is displayed: track number and name, media, fx, fader information, channels and any sends. Here is an example (right).
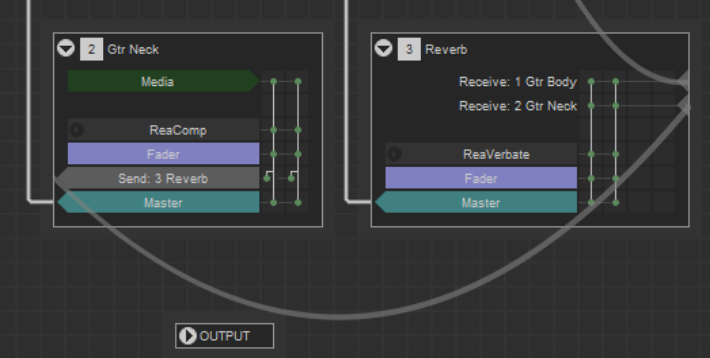
The Gtr Neck track shown here contains media, one FX (ReaComp) one send (to the Reverb track) and a send to the master. It uses two channels (hence the two vertical lines on the right).
The Reverb track contains no media, has receives from tracks 1 and 2, contains ReaVerbate and also directs its output to the master.
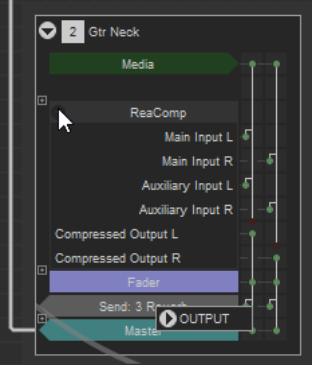
- Click on any FX name
to open its UI – you can then adjust any of its parameters, and/or access its the pin connector. Click where shown here (right) to show all routing information for that FX.
- Click on the text “Fader” to open the routing window for that track:
this has the same effect as clicking on the Route button in the TCP or MCP. You can modify, add or delete track sends and/or receives.
- You can click and drag in Track Wiring view to create new sends
between tracks. The send type will be determined by exactly where you position the mouse before dragging: Hover the mouse over the “body” of any track box (see below right) to see three boxed tiny + symbols on the left side of the track box. Click and drag from the symbol beside the first FX in the FX chain to the destination track to create a Pre fader (Pre FX) send. Click and drag from the symbol beside the box labeled “Fader” to the destination track to create a Pre fader (Post FX) send. Click and drag from the symbol beside the box labeled “Master” to the destination track to create a Post fader (Post FX) send. You can also modify MASTER settings in Track Wiring view:
- Click on any FX listed within the MASTER box to open its UI, where

you can adjust any of its parameters.
- Within the MASTER box, click on the text “Fader” to open its
hardware outputs window, Here you can add, adjust, or remove hardware outputs.
- Within any track box, click on the text “Send” to open its control window. You can modify or delete this send, e.g. to change the send type, adjust volume and/or pan, or specify destination channels.
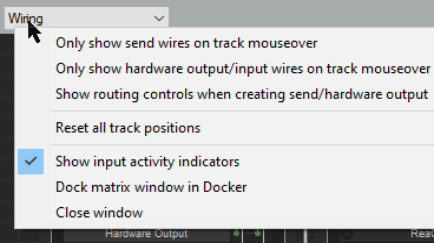
- The more complex the project, the more complex the track wiring diagram. This is where the context menu
can be helpful. Right click anywhere in the Track Wiring window to display the menu shown below.
- You can “unclutter” the diagram using any or all of the three toggle options shown:
Only show wires on track on mouseover Only show hardware output/input wires on track mouseover
Show routing controls when creating send/hardware output.
- If you get into a tangle after dragging and dropping Reset all track positions will get you out of trouble!
- The option Show input activity indicators, if enabled, will cause MIDI and audio inputs to light up in response to any input signal.
- You can use the dropdown list (top left corner of window) to switch between any of the four listed view modes - routing matrix, wiring, track grouping matrix, and region render matrix. This can be especially useful for switching between the track wiring diagram and the routing matrix. This menu includes an option to Dock /Undock the window. Docking is explained ibelow.