1.11 Introducing the Master Track
The functions of the track master can appear overwhelming.
Kind: concept (user-guide-section) Chapter: 1 Setting Up and Getting Started Source: REAPER User Guide v7.70
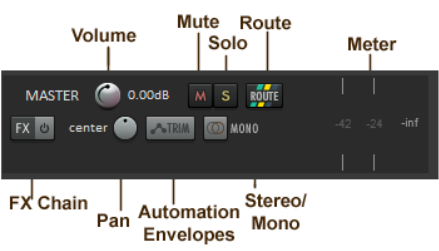
The functions of the track master can appear overwhelming. Experienced hands will find this information useful: for others, everything mentioned in this section will be explored and explained in detail later in this User Guide.
To show the master track in arrange view, choose the command View, Master Track or press Ctrl Alt M. This will toggle display of the master track. As its name implies, the master track controls the output of your mix to speakers, headphones, etc. The functions of the volume, mute and solo controls are self-explanatory. The route button opens a window where you can individually control the volume and panning of the signal sent to different paired outputs – for example, to studio monitors and to headphones. You can add a FX chain and control panning. As well as simple left/right pan, right click on the pan pot for other options, e.g. to specify a pan mode and/or pan law. The trim button gives you access to REAPER’s envelope manager, where you can automate changes to, for example, volume, panning and various FX parameters. Finally, the Mono/Stereo button lets you specify mono or stereo output, with various options available for mono. All these issues will be explained in detail throughout this guide. By default the master track is pinned to the top, and will remain there even as you scroll down through a project.