8.12 Comping with Ranked Take Markers
Ranked take markers can assist you in exploring and evaluating your options when comping, whether you are using legacy takes or fixed media lanes.
Kind: concept (user-guide-section) Chapter: 8 Managing, Comping and Editing Takes Source: REAPER User Guide v7.70
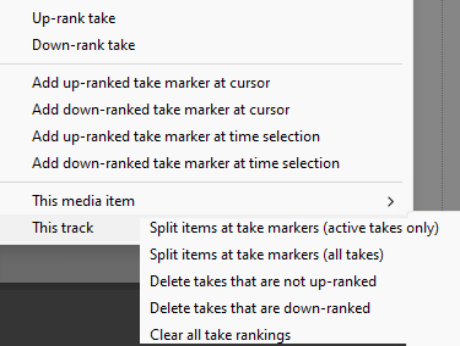
Ranked take markers can assist you in exploring and evaluating your options when comping, whether you are using legacy takes or fixed media lanes. The example that follows uses legacy takes, but these techniques can also be adapted to apply when working with fixed media lanes. (With fixed media lanes you will need to enable Allow editing source media while comping from the right-click Comping menu.) Take markers added to sections of each take can be upranked (yellow face) or down-ranked (red face). This can assist you in identifying where to slice and dice your takes and in removing unwanted segments. Note the section of the Take Markers context menu shown on the right. These commands can be used to add and work with up/down ranked take markers. You might find it rather clumsy to work with the mouse both to move around the mouse cursor and use rightclick context menus at the same time. For this reason, you should familiarise yourself with some of the keyboard shortcuts that are available perform many of these tasks. Some examples of these are listed below. You might also wish to add some of your own to suit your own workflow. Before we start, make sure that you are familiar with basic item take marker management techniques as outlined earlier in this chapter. These include snapping to, moving and deleting take markers.