2.3 The Transport Bar
If the Transport Bar is not visible in your REAPER window, use the View, Transport command to display it, or use the keyboard shortcut Ctrl Alt T.
Kind: concept (user-guide-section) Chapter: 2 REAPER Project Basics Source: REAPER User Guide v7.70
If the Transport Bar is not visible in your REAPER window, use the View, Transport command to display it, or use the keyboard shortcut Ctrl Alt T. The Transport Bar appears docked just below arrange view, or, as shown here, as a floating window (undocked) inside REAPER. The main Transport Controls are shown here, though your exact layout might not be identical.
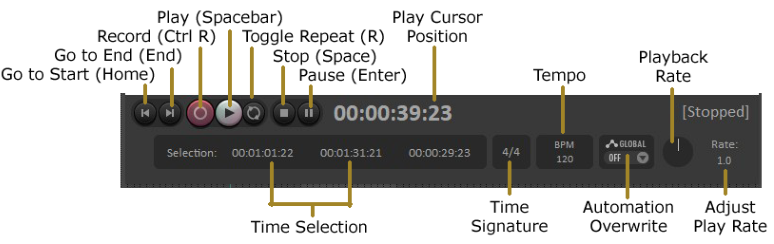
The four standard transport buttons are Go to Start, Go to End, Record and Play. After these come Toggle Repeat loop, Stop and Pause. The Stop button stops playback and returns the play cursor to the position it was in when playback started. The Pause button pauses playback without moving the play cursor. If the material being played is too long for all of it to be displayed at once then the display will scroll as necessary, provided that Options, Automatically display view during playback is enabled. The Record button starts and stops recording, without stopping playback. Clicking on the Stop button when recording will stop both playback and recording. The Toggle Repeat button turns on and off the option for any looped time selection to be played over and over again during playback. The Global Automation Override feature will be explained in Chapter 18. Further to the left of this the current time selection is shown (start position, end position and length). The current play cursor position is also shown: in the above example this is 7.1.00/0:12.000. Above this and in the center is the playback status (Playing, Paused or Stopped). Notice also edit boxes that show the project Tempo (BPM) and Time Signature values. To change the value of either box click in the box and type the new value. Depending on your mouse preferences (Chapter 22), you can also use your mousewheel to adjust this. The beat basis (quarter note, eighth note, etc)) is displayed above the tempo, and can be changed at the current cursor position from the menu that is displayed by right clicking in this area. Finally (in the above layout) is the playback rate. This can be made faster or slower by adjusting the fader knob. If adjusted, this knob is colored green. Double-clicking resets the rate to 1.0. You can also hover your mouse over the box and use your mousewheel to increase (up) or decrease (down) the value. Three other useful transport control keys are Ctrl Left (go back a little), Ctrl Right (go forward a little) and Alt Space (play, skipping loop selection. Right clicking over the Transport Bar displays a context menu. This may seem slightly intimidating at first. We'll get to the more advanced stuff in Chapter 10, but for now just notice that there are menu options available to:
- Select your preferred time display format.
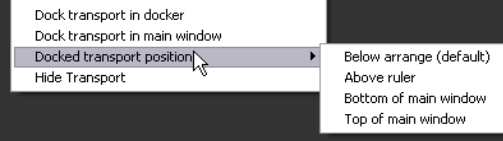
- Dock or Undock the transport in the Main Window. You can choose the main docker or any of four other positions – Below arrange view, Above ruler, Bottom of main window or Top of main window.
- Flash transport status as yellow if a possible audio under-run is detected.
Note: The transport bar appearancecan be modified using the theme adjuster, for example to hide any controls surplus to your requirements. See Chapter 15.
Scrubbing
The top of the edit cursor is marked by an upside down triangle. You can grab this with your mouse and drag to move the edit cursor without affecting playback. Depending on your preferences settings, you may need to hold down the Shift key. If you do this when the project is not playing, it will “scrub” your audio -see Chapter 10 of this User Guide.
