17.6 FX Containers and Parallel FX Processing
This advanced topic is not really suitable for beginners.
Kind: concept (user-guide-section) Chapter: 17 More Routing Examples Source: REAPER User Guide v7.70
Introduction
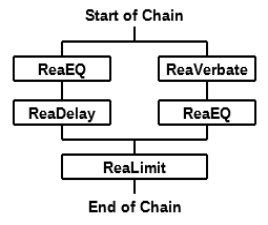
This advanced topic is not really suitable for beginners. REAPER’s FX containers allow you more flexibility and a greater capability in creating and managing FX chains than simply running two or more FX in parallel with each other. This advanced topic might take a little longer for you to get your head around. It’s more appropriate for experienced users than for beginners. To understand FX containers and how they work, let’s look at an example (right).
In this example, as in the others, the actual FX being used are for illustration only and are not the focus of the exercise. What matters is the technique, which could be applied using other FX of your choice. What we have here is two parallel FX chains rather than just two parallel FX. To achieve this, REAPER will:
Pass the audio signal into a container. This container will need to consist of enough channels as are needed to allow for (in this case) two parallel chains, i.e. four channels in all, one pair for each chain. As the audio stream exits the container, the outputs of the two parallel channels will need to be merged as they are passed on thru channels 1/2 of the FX chain to any subsequent FX (in this example, ReaLimit). To recap, channels 1/2 are used by default by the track to send audio output to the master. So, to summarize, a container will need enough inputs and enough channels (in this example, four) to allow the different streams to be processed independently of each other, and enough outputs (again, in this case four) to allow the streams to be merged as they exit the chain. That’s a lot of theory to take in! Let’s see how it’s done in practice.
Example 1
To set up the FX container described above:
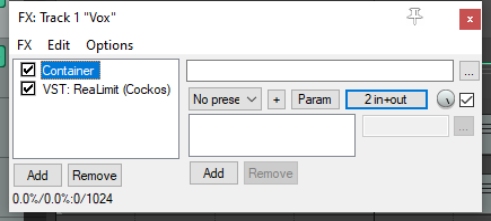
- Click on the track’s FX button, then Add, then
from the displayed list of FX double-click on Container. A container is added to the FX chain and its empty window displayed. Immediately after the container, in the far left column, add ReaLimit. Select the container. Your track FX window should now resemble that shown on the right.
- Click on the container’s button labeled 2
in+out to open its pin connector window. Here you can define its parameters. We’ll get to the pin connectors shortly. First, notice that by default the container inherits the same number of input/output channels as the track – in this case two.
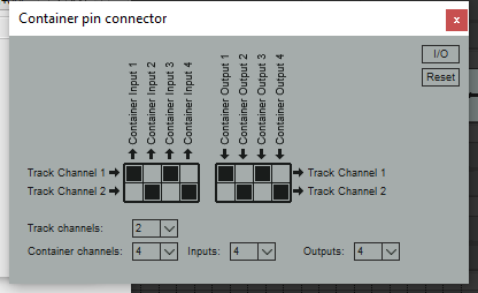
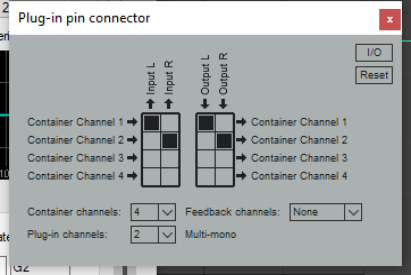
- Set the number of container channels, inputs and
outputs to (in this example) 4 and complete the pin connector matrix as shown here (right). Instead of 2 in+out, the connector button will now read 2/4 in+out as shown below right.
- This directs input from track channel 1 to
container inputs 1 and 3, and from track channel 2 to container inputs 2 and 4.
Output from container channels 1 and 3 will pass to track channel 1, and output from container channels 2 and 4 will pass to track channel 2. 5. Using the Add button in
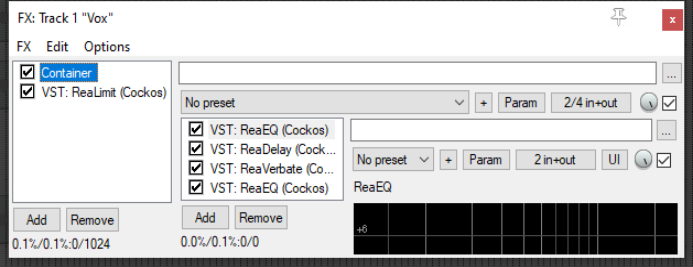
the container window we can now insert the required FX into the container’s FX chain – for this example ReaEQ, ReaDelay, ReaVerbate and a second instance of ReaEQ. Your FX window should now resemble that shown (right).
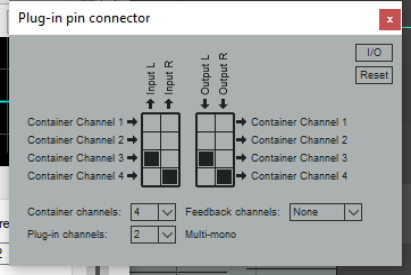
- The pin connectors for the first two container FX will both need to be set to receive input from and send
output to container channels 1 and 2 only, as shown here (below left).
- Similarly, the pin connectors for other two FX will both need to be set to receive input from and send
output to container channels 3 and 4 only (below right).
- Finally, you can experiment with adjusting the various FX parameters – and save this file as a model that
you might find useful for future use.
Note: A new container can be added to an existing FX chain by choosing Add FX container from the FX menu. You can also create a new container from this menu by selecting any FX or selection of FX in the chain and choosing Move to container from the FX menu.
Example 2
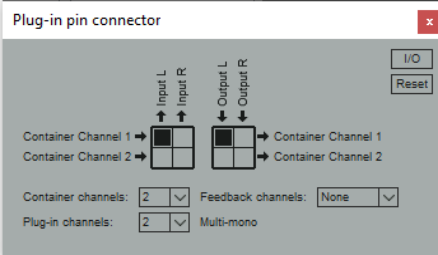
In this example we will split an audio stream into two chains – left and right – and apply separate FX to each stream before returning the signal to the FX chain, one FX to channel 1 (left) only and the other to channel 2 (right) only. A possible application for this technique could be on a vocal, using one EQ instance to add body, the other to add clarity. In this case, the pin connector numbers should be left at its default settings – two container channels, two inputs, two outputs. The pin connector settings for each of the two EQ instances could then not be simpler. The first takes its input from and sends its output to channel 1 only (as shown here). The second takes its input from, and sends its output to, channel 2 only.
More Complex Applications
FX containers are handy, but even they do have their limitations! More complex models can be created using REAPER’s pin connectors – for example, fine tuning your parallel processing requirements, or directing the output from some FX to a different track. For these and other related topics refer back to to the JS: Channel Mapper-Downmixer.
Tip 1: FX containers can be even more powerful when combined creatively with other REAPER features. For example, you can have two or more containers running in parallel with each other!
Tip 2: You can select any FX or number of FX in a track or item’s FX chain, then choose Move FX to container from their right-click context menu to move those FX into a new container.
Tip 3: An entire container, complete with its FX and its routing, can be saved as a preset which can be recalled into other tracks and in other projects.