17.15 MIDI Routing and MIDI Buses
REAPER's 128 MIDI Buses vastly increase your MIDI routing options.
Kind: concept (user-guide-section) Chapter: 17 More Routing Examples Source: REAPER User Guide v7.70
REAPER's 128 MIDI Buses vastly increase your MIDI routing options. Each bus can carry up to 16 channels, offering you 2048 virtual MIDI channels in all.
MIDI Buses can be used to to direct MIDI data to specific instruments, e.g. on a single track ReaSynth or ReaSamplomatic. It becomes more useful with multi-timbral software (e.g. Kontakt).
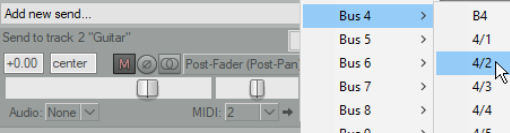
You can also use MIDI buses to send MIDI CC messages, including to specific FX. When you create a MIDI send, as well as the usual channels 1 to 16 you have the option of selecting any of the 16 channels on any of the 128 MIDI buses. In the example shown (above), B4 means use bus 4 on current MIDI channel, 4/2 means Bus 4 channel 2. REAPER’s native MIDI routing capabilities are as powerful and as flexible as its audio routing capabilities. The exact method is different, but the concepts are similar. This is quite a complex topic. Make sure you are familiar with REAPER’s general routing
essentials described in this chapter before you attempt it.
REAPER uses MIDI buses to overcome the limitations imposed by the standard of 16 MIDI channels. REAPER’s 16 MIDI buses extend this capability. Each bus can handle up to 16 channels of MIDI data, making available to you 2048 virtual MIDI channels in total! If no MIDI Bus is specified, then for plugins the default, Bus 1, is used. Using MIDI buses any track can receive MIDI data from and send MIDI data to as many or as few of these channels as you wish. For example, using MIDI buses you can:
- Host multiple VST instruments on a single track. You can “team” them so they can share the same MIDI
data and “split” them so that each receives different MIDI data on its own dedicated MIDI bus, as well as sending MIDI data on any of the MIDI buses to other instruments on that track.
-
Route MIDI Continuous Controller (“CC”) data to specific plug-ins (instruments or FX).
-
Have more options for using parameter modulation to allow the MIDI data generated by manipulating one
instrument’s controls to also be passed via a MIDI bus to another instrument. This will be explained shortly. When working with plug-ins in an FX chain, MIDI data can be placed on a MIDI Bus in two standard ways:
- Using the track’s Routing capabilities: the MIDI data sent can be filtered by MIDI channel or MIDI Bus or both. That filtered MIDI can be sent as filtered or to a selected MIDI Bus or channel or both, or 2. Setting the MIDI Output for a plug-in: the MIDI can be sent to any MIDI Bus (the MIDI channel cannot be specified, that is determined by the plug-in). Note that only standard MIDI events (that is, those on MIDI Bus 01) can be edited in the MIDI Editor Piano Roll. The MIDI data on the other MIDI Buses is conveyed in MIDI SYSEX messages and is displayed in the SYSEX lane in the MIDI Editor. You could edit those messages in that lane or in the Event List. Keep in mind also that MIDI buses can convey not only CC messages but also notes and other information.
Example 1: Sending and Receiving MIDI Data
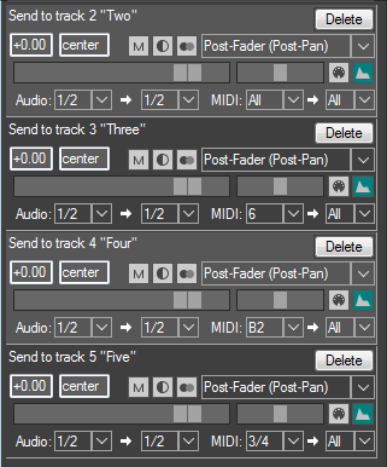
Let us look at the track send / filtering possibilities first (above right). Here are four sends from track 1: 1. The Send to track 2 sends all the MIDI data. 2. The Send to track 3 sends all the MIDI data on MIDI channel 6 only, regardless of the MIDI Bus. 3. The Send to track 4 sends all the MIDI data on MIDI Bus 2 only, regardless of the MIDI channel. 4. The Send to track 2 sends all the MIDI data on MIDI channel 4 on MIDI Bus 3 only.
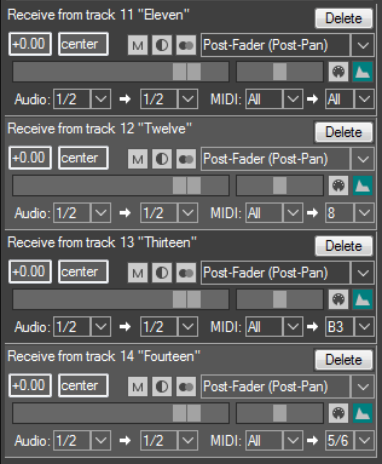
And now, the receives. Here are four receives on track 15: 1. The Receive from track 11 receives all MIDI data, MIDI Buses and channels are unchanged. 2. The Receive from track 12 receives all MIDI data and changes MIDI channel to 8, MIDI Buses unchanged. 3. The Receive from track 13 receives all MIDI data, placing it on MIDI Bus 3, MIDI channels are unchanged. 4. The Receive from track 14 receives all the MIDI data, changes the channel to 6 and places it on MIDI Bus 5. As you can see, Reaper offers a powerful mechanism for filtering MIDI events and rerouting that filtered MIDI.
Example 2: Teaming Multiple Instances of ReaSynth The Model
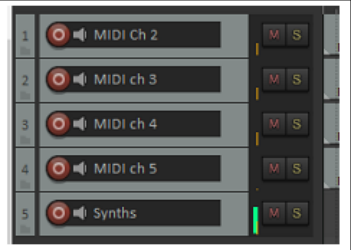
This will show you how to team a number of instruments together in a single track so that they work together to produce your music. For the sake of simplicity we will use just two instances of ReaSynth, but we could choose to use more if we wished. This is best understood by working thru a relatively simple example. Using MIDI buses, we can route the four MIDI tracks shown here (each with data on a different channel) to a single audio track which will contain our two VST instruments and several VST audio plug-ins. In this example, each of the instances of ReaSynth uses different parameter settings. We wish to set this up so that the output of tracks 1 and 2 goes to the first synth, and tracks 3 and 4 to the second synth. MIDI buses allow us to do this, and effectively use the two synths almost as if they were a single multitimbral instrument.
The Routing
We start by inserting the two instances of ReaSynth into the FX chain of a new track. We can rename them as ReaSynth 1 and ReaSynth 2. Of course, you can use different instruments if you prefer. We can then open this track’s routing window and create sends/receives along the lines shown here. Different combinations of MIDI data are sent to two MIDI buses – Bus 2 and Bus 3. Each of these buses will be assigned in turn to one of the two synths – Bus 2 to ReaSynth 1, Bus 3 to ReaSynth 2. We could have used whichever buses we liked, although for reasons that we’ll get to later you might wish to avoid Bus 1. 1. All the MIDI from track 1 is received on channel 2 on bus 2.
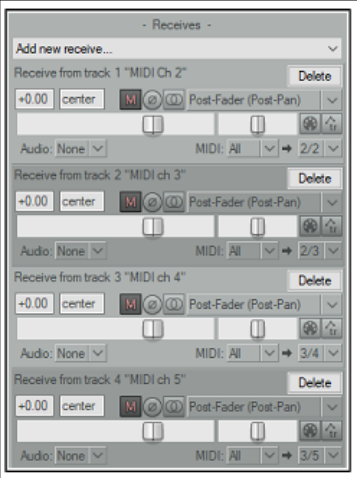
- All the MIDI from track 2 is received on channel 3 on bus 2. 3. All the MIDI from track 3 is received on channel 4 on bus 3. 4. All the MIDI from track 4 is received on channel 5 on bus 3. We have used different MIDI channels so that the sources can be distinguished, if needed. ReaSynth processes MIDI on any channel. If you were using a multitimbral plug-in, such as Kontakt, SampleTank or Falcon, then the plug-in would receive all the MIDI data on the selected Bus (or that on Bus 1, if none is selected) and the MIDI events on the different channels would drive different instruments / sounds loaded within the plug-in.
Assigning the Buses
The next step is to assign a separate bus to each of the synths. First, we can select ReaSynth 1, then right click on the Routing [2 out] button, then select MIDI input, then MIDI Bus 2. We can repeat this process to assign Bus 3 as the input for ReaSynth 2. We can then add whatever audio FX we like to the FX chain – e.g. stereo width and reverb and play back the music, adjusting any of the synth or FX parameters at will. If you wish to use different FX on the audio from each synth you can make the track multi-channel and connect the synths and FX to the appropriate audio channels, as described in channel splitting earlier in this chapter.
Example 3: Driving Multitimbral Samplers
We can take the previous example further and replace those instances of ReaSynth with (say) Kontakt and Sample0Tank respectively. For Kontakt, we could set its MIDI Input Bus to 2 and load two instruments into the rack, set one to MIDI chl 2 and the other to MIDI chl 3. For SampleTank, we could set its MIDI Input Bus to 3 and load two instruments into the instrument slots, set one to MIDI chl 4 and the other to MIDI chl 5. On playback you would hear all 4 different sounds, each driven by its own original source track. And, of course, the combined audio can be further processed with FX. In theory, you could have 16 multitimbral plug-ins, each on a different MIDI Input Bus, and with 16 different sounds loaded in each plug-in. That would provide 256 different sounds, but it would be rather a cacophony. Footnote: A huge thank you to Michael Schnell and DarkStar for their inexhaustible patience and invaluable help with the production of this section.