3.14 Layered Recording
The term layering refers to a recording technique in which two or more instruments and/or voices are recorded for the same song, but not all at once.
Kind: concept (user-guide-section) Chapter: 3 Recording Audio and MIDI Source: REAPER User Guide v7.70
The term layering refers to a recording technique in which two or more instruments and/or voices are recorded for the same song, but not all at once. The tracks can be recorded one at a time. An initial track is laid down – this is often a guide track which will be discarded at the end of the recording process. Then each other track is recorded while the musician or singer listens thru headphones to a mix of what has already been recorded and what she is recording now. In order to use this layered recording method:
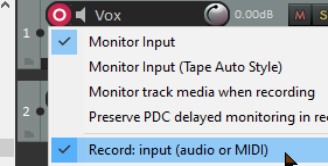
- With Record Mode set to Normal, record the initial track, as explained earlier. 2. After recording, make sure the output of this track is directed to the Master. Make sure also that you “disarm” this track. 3. Make sure that the Master is directed to whichever hardware outputs are connected to your headphones or headphone amp. 4. Add another track. Name it. Arm this track for recording. Select the Input used by the microphone or line that is to be used to record this new track. 5. Make sure that Record: input (audio or MIDI) is selected and (if your soundcard does not support direct monitoring) that Input Monitoring is turned on for this track (see above). This will enable the person being recorded and the recording engineer to hear in their headphones a mix of previously recorded material with that being recorded now. 6. Adjust the Volume levels of the previously recorded track (using the track fader) and the volume level of the incoming signal (using your external mixer desk or audio device, or audio device control software) until you are happy with your headphone mix. 7. Press Ctrl R to start recording, and Ctrl R again to stop when finished. Again, disarm this track when you have finished recording on it. 8. Repeat this procedure for all other tracks to be layered. At step 6. you can feed into your Master a mix of all tracks previously recorded up to that point.
Note: If you notice an echo type delay in your headphones it will be because latency is too high. Lowering the block size (see 1.12) to 256 or 128 can improve this. On consumer quality built in sound cards, however, this might cause pops and clicks. For Windows users, the use of ASIO drivers might help resolve this.
Tip: Many sound cards and USB or Firewire audio devices come with software that can be used for zero latency input monitoring and headphone mixing, especially those devices with multiple inputs and outputs. If you use that software for input monitoring, then you should turn off the input monitoring option within REAPER.
Try it now! Open the supplied project file All Through The Night.RPP and save it as All Through The Night LAYERS.RPP. Have a go at recording another instrumental track of your choice to go into this project any instrument you choose!
Note 1: Monitor Input (Tape Auto Style). This option differs from normal input monitoring in that it monitors input only when the transport has stopped or when you are recording. During playback you will hear only the timeline audio, not the input.
Note 2: If you are monitoring an armed track when an existing track uses a plug-in (such as ReaFir) that has latency, you may wish to consider enabling the option Preserve PDC delayed monitoring in recorded items. This more advanced topic will be explained in more detail later in this chapter.