16.4 Sound Shaping Effects: ReaEQ
EQ means “equalisation.” It is used to emphasise (or de-emphasise) selected frequencies.
Kind: concept (user-guide-section) Chapter: 16 REAPER Plug-ins in Action Source: REAPER User Guide v7.70
EQ means “equalisation.” It is used to emphasise (or de-emphasise) selected frequencies.
ReaEQ is REAPER’s main EQ plug-in: there are also several JS EQ plug-ins but ReaEQ is the most powerful and flexible. Let's take an example.
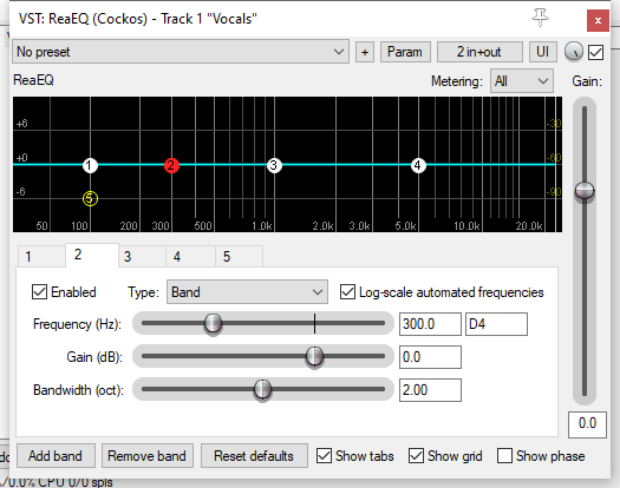
- Open the project file All Through The Night.RPP and save it as All Through The Night EQ.RPP. Select track 1. 2. Click the FX button, click on Cockos then on VST: ReaEQ. By default this has 4 band tabs. 3. Play the song. Select Band 4 and fade the Gain left to about – 35 dB. The voice becomes deeper. Double click on the fader to return it to the centre. 4. Select Band 2. Fade the Gain down to about – 14 dB. Notice how tinny and even disembodied the voice sounds. Double-click to return to normal. Now lift the Gain to about +3 dB. The voice should sound quite pleasantly fuller and warmer. Select Band 3 and set the Frequency to about 4200. Observe what happens as the gain is adjusted between +3.5 and -3.5. When finished, return it to 0.0. Save the file. Frequencies are a huge subject and go way beyond the scope of this guide Here is a brief introduction. Exactly how you divide up the frequency spectrum is to some extent arbitrary. Here’s one way that makes sense:
Frequencies Comments
16 to 60 Hz
Very Low Bass. These frequencies are felt rather than heard.
60 to 250 Hz
Bass. Herein dwell the fundamental notes of the rhythm section. A modest boost here can help make a sound fuller, but too much gain will make it boomy.
250 to 2000 Hz
The Mid Range. Too much gain here makes it sound like you’ve recorded from the other end of a telephone. If a take sounds muddy, try cutting it here.
2000 to 4000 Hz
Upper Mid Range. Often a tricky area. Too much can cause listening fatigue. Lower this range a tad on the mix while boosting a tad on vocals can help a vocal stand out.
4000 to 6000 Hz
Presence Range. The key range for clarity and presence of instruments and vocals. Some gain here will bring the part forward in the mix. A drop can pull it back.
6000 to 16000 Hz
High Range. This is where you find clarity and sparkle. Too much gain here produces a searing, glassy effect. Not enough will sound dull ands “heavy”.
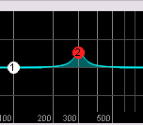
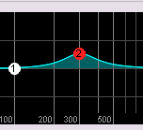
Now let’s look at bandwidth. ReaEQ measures bandwidth in octaves. A narrow bandwidth setting means that you will raise or lower the sound over a very small part of the frequency spectrum. A wide setting means that you will be working on a much wider part of the spectrum. Examples of how a narrow bandwidth (left) and a wider bandwidth (right) can shape a sound are shown here. You will also see, if you display the drop down list labelled Type that there are several type of band. Some commonly used are: Band: the volume is raised or lowered either side of the frequency, the range being determined by the bandwidth setting. Sometimes called a “peaking filter.”
Low/High Pass: filters out frequencies above/below the frequency setting. Low/High Shelf: causes the gain to be moved below/above the frequency setting. Pass and Shelf will in most cases only be used (if at all) at very low frequencies or very high frequencies. Parallel Band Pass: these run independently of each other and are then summed. You can add or remove bands using the Add band and Remove band buttons. To adjust parameters of any band you can use the fader controls (frequency, gain and bandwidth), enter values directly in the edit boxes, or drag the handles on the graph display itself. As well as the usual mouse controls, you can use Ctrl mousewheel to fine-adjust bandwidth and Ctrl Shift drag when adjusting the point for fine adjustment of bandwidth. Right-click on any of the band handles on the graph for a context menu whose options include:
Adding or deleting a band Flipping all bands Enable/Disable band (toggle) Changing the band type Using large band handles Reset current or all bands to 0 dB Setting analyzer slope (0 dB,3 dB or 5 dB per octave Other toggle options to log-scale automated frequencies, show tabs , show grid and show phase display. Note also the Gain fader (on the right), used to adjust output volume. Wet/dry mix rotary control (near the top right corner of the FX window): this creates a mix of the wet and dry signals. Full left is 100% dry, full right (the default) is 100% wet. Alt click to toggle on/off the option Delta solo – the difference between dry and wet signals. This option is on all FX windows. See also Chapter 17.
EQ channel settings and channel analysis:
By default, your ReaEq settings will be applied to all track channels. For example, for a stereo item, the settings will be applied to each channel. If you wish to change this (e.g. to EQ only the left channel of a stereo pair) you can do this with REAPER’s pin connectors. These are explained in detail in the chapter that follows this one. That said, even while applying the FX (for example) to both channels in a stereo pair you might wish to view the effect of that FX on just one of those channels. This can be achieved by selecting the required channel(s) from the Metering dropdown. For a normal stereo item, your options will be All, 1, 2 or none.
Tip: Don’t forget that you can create track parameter controls and/or automation envelopes for this or any other plug-in by clicking on the Param button in the plug-in window – as explained in Chapter 11.