20.1 Simple Video Editing
With the introduction of version 5.0, REAPER's video capabilities have been considerably enhanced and expanded.
Kind: concept (user-guide-section) Chapter: 20 Using REAPER with Video Source: REAPER User Guide v7.70
With the introduction of version 5.0, REAPER's video capabilities have been considerably enhanced and expanded. In overview, you can:
- Carry out simple editing tasks like deleting, moving or copying parts of a video.
- Edit an existing video soundtrack.
- Add new sound to a video.
- Add various visual effects to a video track, such as fading and lighting.
- Edit or blend the contents of several video files into one, optionally using effects such as crossfade.
- Use automation envelopes to manage your video effects.
- Render the output of your project into a new video file. Throughout this chapter a basic understanding and knowledge of REAPER's audio, editing and project management features is assumed: only those aspects specific to video will be explained in detail. We'll start by looking at and working thru some practical examples, then towards the end of the chapter deal with the more technical aspects such as settings and preferences. Later in this chapter we'll look at issues like video workflow, but first we'll look at how REAPER handles video.
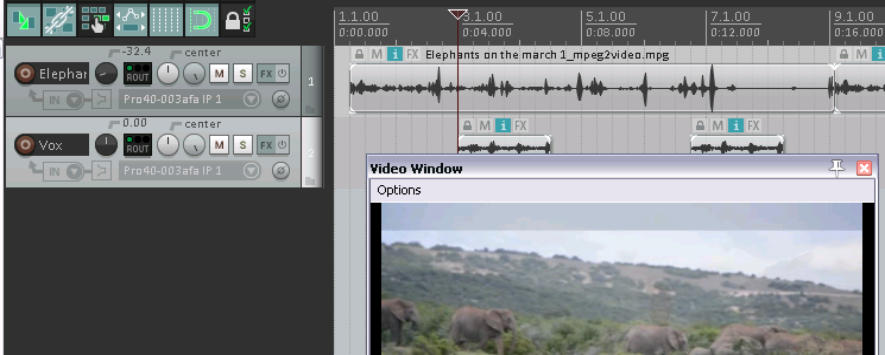
REAPER can be used to edit the soundtrack of your video files, such as .MOV, .WEBM, .AVI, .MPG, .VLC, .MP4 and .WMV files. These files are imported via the Insert, Media File command, or by dragging and dropping into the Arrange window. You can use the Track, Insert Track from Template command to import data from a .EDL file. Use the View, Video Window command, Ctrl Shift V, to show the video window (which is dockable). For Windows users, video playback is handled by Direct Show (but see 20.7): MacOS uses Quick Time. You can edit the original soundtrack, and/or add extra audio tracks and items to the existing soundtrack (as shown above). The Options menu in the video window (shown right) offers a number of useful features, including: Dock: This option enables you to dock the video window. The same command will also undock an existing docked window. Docking is discussed throughout this user guide. In particular, simple docking is explained more fully in Chapter 2, and the use of multiple dockers is explored in Chapter 12.
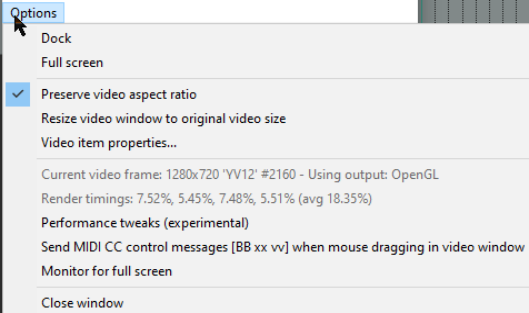
Full screen: A toggle command used to expand the video window to cover the whole screen. In full screen mode, right click anywhere to display this menu. Preserve video aspect ratio: When enabled, this ensures that the height:width picture ratio is maintained no matter how the window is resized. Resize video window to original video size: Needs no explanation! Video item properties. This opens a window revealing the properties (length, video, audio, decoding format, etc.) of the video item.