22.4 Audio Configuration and Settings
Let’s look again at the Audio Device preferences screen.
Kind: concept (user-guide-section) Chapter: 22 REAPER's Preferences and Other Settings Source: REAPER User Guide v7.70
Let’s look again at the Audio Device preferences screen. Two important issues here concern buffers and latency. Understanding what these terms mean will help you in obtaining the optimum settings for your system. Getting buffer size right is essential if you are to get the best performance from your audio interface. Make them too small and you'll get audio clicks and pops; make them too large you'll notice delays in your headphones when you’re input monitoring, especially with software synthesizers. The goal is to achieve the lowest possible latency without experiencing dropouts. The optimum setting depends largely on your audio interface (PCI sound card, firewire or USB device), your PC’s characteristics, as well as which software you’re running. The use of plug-ins can also increase latency, some more than others. Consider what happens when you are working at your DAW. As you play your tracks, a constant stream of data passes from your hard disk and/or RAM to your sound card. Amongst other things, this converts the digital data to an analog form, so that it can be sent to, and heard thru, your speakers or headphones. When you record the reverse happens – the incoming analog audio stream has to be converted to a digital format. During overdubbing both of these activities happen at once. With input monitoring, the track(s) being recorded are actually being fed into the computer in analog form, converted to digital, processed, then converted back to analog again as they are fed back to your headphones. Latency is a measure of this delay. Incidentally, you can make this activity easier if your audio device itself supports input monitoring. In this case, the incoming audio stream that is being recorded is fed straight back into your headphones before it even gets into the computer. As if this wasn’t complicated enough, remember that your Mac or Windows computer is performing all sorts of other tasks at the same time as you are recording. Windows users, for example, can view their Task Manager and check the Processes page to have a look. That’s what we mean by multitasking.
So how is Windows able to keep up with its other 99 or so tasks at the same time as handling your recording? It does so by dividing its resources between all the tasks at hand. In order to maintain a constant audio stream, small amounts of memory are allocated to storing this audio stream. These areas are called buffers. Thus, as you play back your audio, Windows hands over to your sound card a block of audio that the sound card releases at a steady rate to your external amplifier. If it empties these buffers before Windows gets round to handing it some more, then you’ve got a problem. The same principle applies, but in the reverse direction, when you’re recording. And again, when you’re layering or overdubbing, or using REAPER’s input monitoring, both activities are going on at the same time. If the buffers are too small, you’ll get gaps in the audio stream. These can lead to pops, crackles and in some cases even dropouts (that’s when playback and/or recording just stops suddenly and unexpectedly). Making buffers larger is usually enough to fix this problem, but it brings with it another. Make them too large, and the data at the end of the buffer has a long wait before it is processed. That’s when you experience unacceptably large latency, such as the delay between pressing a keyboard and hearing the note in your headphones. The macOS uses CoreAudio to manage these issues. PC users, on the other hand, are faced with a possibly confusing choice as to which drivers to use. ASIO drivers generally offer better latency than others. As a rule, the preferred order is ASIO, WDM, DirectX and MME, in that order. This is where the ASIO Configuration button on the Audio Device screen is so important (assuming, of course that you are using ASIO drivers). It opens the audio settings screen for your soundcard. Shown below is an example of the settings page for one particular external soundcard. It is only an example don’t expect yours to look identical, although it is likely to contain similar settings (sample rate, buffer size, etc.)
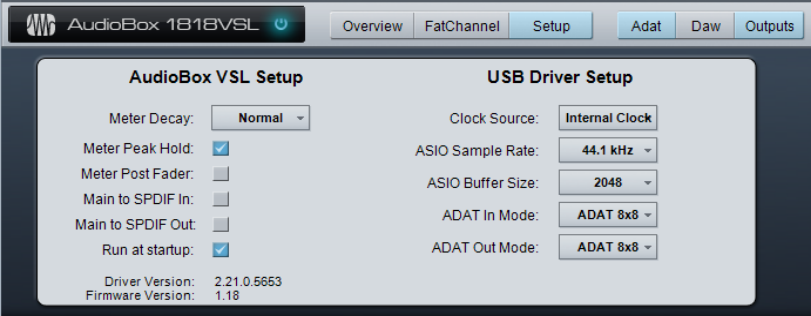
The smaller the buffer size, the greater the load on your computer’s CPU.
So after making changes to your buffer size, check the CPU usage on REAPER’s Performance Meter. You can use this fact to your advantage when mixing. As a rule, low levels of latency are only really needed for recording, not when you are only playing audio back. Therefore, if you find that you are pushing your CPU close to its limits, you will often be able to fix this by accessing your audio card’s control software and increasing the buffer size. Sample Rate also affects CPU usage. Going from 44100 to 88200 doubles CPU usage. This is an area about which there is much debate, but in reality few of us have ears that can really detect whether a track has been recorded at 44100 or at 88200. Test this out for yourself and see what you think. Check also your MIDI Devices settings preferences. This has been covered in Chapter 1.