2.11 Using the Supplied FX Presets
To get started you might wish to explore some of the presets that come with these plug-ins.
Kind: concept (user-guide-section) Chapter: 2 REAPER Project Basics Source: REAPER User Guide v7.70
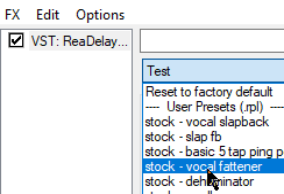
To get started you might wish to explore some of the presets that come with these plug-ins. For example, Cockos ReaDelay includes presets which you can try with your various tracks. Simply display the drop down list and select the item that you want (example shown right). Most of the Rea plug-ins include presets, which you can explore for yourself. Of course, you can also make any adjustments and changes to these that you like, in order to customize them more precisely to your own needs.
To set any FX preset as the default for that FX
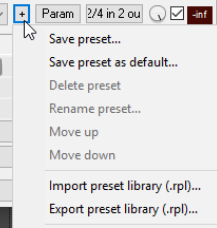
- Select the required preset from the drop down list. 2. Click on the + button to the right of the list and choose Save preset as default from the menu. 3. Type your own name for the preset and click on OK. To download more presets, go to http://stash.reaper.fm/ and follow the link to FX Preset Libraries.
To import downloaded presets into REAPER, follow this sequence:
- Insert an instance of the plug-in into any track. 2. Click on the + button (next to the Param button in the FX Chain window). 3. Choose Import Preset Library. 4. Navigate to and select the required .RPL file then click on Open (or, to insert several files, use Ctrl click to build your list before clicking on Open.)
To select a preset when loading an FX
- Open the track FX window and click on the Add button. 2. Select required category (e.g. Cockos) and required FX (e.g. ReaEQ). 3. Right click on the FX and choose Add to… from the context menu. 4. In the FX window, click on the + button then select the required preset.