2.17 Time Selections and Time Loops
You might need to work on just a part of your project for a while.
Kind: concept (user-guide-section) Chapter: 2 REAPER Project Basics Source: REAPER User Guide v7.70
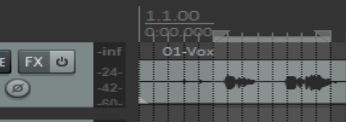
You might need to work on just a part of your project for a while. To do this, first check the Options menu to see if Loop Points Linked to Time Selection is enabled. If it is, then making a time selection and defining a loop are the same thing. If not, then making a time selection and defining a loop become two different things. Either way, to define a loop area click and drag along the timeline. The start and end of the loop are marked by two small equilateral triangular indents.
- Stop the playback at or near the point where you want your loop to begin (or click your mouse in the
background area) to move the Edit Cursor there.
- Place your mouse over the Timeline (above the first track), then click/drag along it, releasing the mouse to
define the area to be looped. This is shown here. The start and end of the loop are marked by two small triangles. If when you attempt this the selection snaps outwards to define a larger area than you want, then REAPER has snapping enabled. Snapping will be discussed in detail in Chapter 7: The shortcut keys Alt S toggle snapping on and off.
Tip: To set the loop selection to match a media item, hold Ctrl while you double click on that item. To set the time selection to match a media item, hold Shift while you double-click on the item.
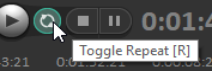
Now when you play the project, provided that the loop (toggle repeat) button on the transport bar is engaged, it will replay over again the area selected for your Loop. If loop points are linked to time selection, the start time, finish time and duration of the selection are also shown on the Transport Bar. Pressing the R key toggles this repeat function on and off. There is also the option (under Options, Preferences on the Playback page) to stop playback at the end of a loop when the repeat function is disabled. To change the area defined as your loop, repeat the original procedure. To clear the loop altogether, without defining a new one, press the Escape key.
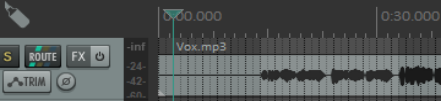
If loop points are not linked to time selection, you can
define a time selection by clicking and dragging in the space underneath or between the media items, in the arrange view background area.
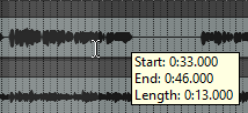
Note that when you mark a time selection, a tooltip pops up which shows the start position, end position and length of your selection.
Right clicking on the Timeline then gives you a menu of commands which you can apply to a time selection, including Zoom Selection. You can use this menu to change the units used on the timeline – for example, Minutes:Seconds, Measures:Beats, Measures:Beats , a Measures.Beats
(minimal), Measures.Beats (minimal). Measures.Fractions, Seconds, Samples,
Hours:Minutes:Seconds:Frames or Absolute Frames. You can also specify as a secondary time unit Minutes:Seconds, Seconds, Samples, Hours:Minutes:Seconds:Frames or Absolute Frames. The other commands on this menu will be discussed elsewhere in this User Guide, as the need arises. These are features that you are likely to find useful when editing your files. Incidentally, to zoom out of a time selection and restore a whole project length to view, press Ctrl PgDown. There's more about loops and time selections elsewhere in this guide, e.g. Chapter 9.