7.32 Crossfades and the Crossfade Editor
Typically, a crossfade is used to transition gradually from one media item on a track to another.
Kind: concept (user-guide-section) Chapter: 7 Managing and Editing Media Items Source: REAPER User Guide v7.70
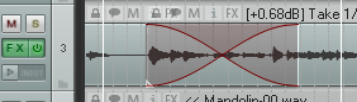
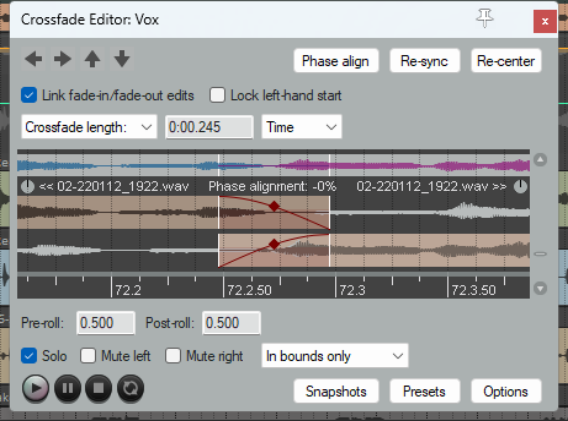
Typically, a crossfade is used to transition gradually from one media item on a track to another. As the first item is gradually faded down, the second is faded up. In the example shown (right), two media items overlap each other with a crossfade. Use Alt X or the toolbar crossfade button to toggle auto-crossfade mode on and off. When enabled, dragging the start of one media item over the end of another (or vice versa) will automatically create a crossfade. Default crossfade parameters (including fade and crossfade shapes) are set in the Item Fade Defaults page of REAPER's preferences. Various crossfade elements (such as shape, start and finish) can be edited with your mouse in much the same way as you might edit a simple fade. Often this might be all you need to do. However, the Crossfade Editor gives you more control over your crossfade characteristics. After selecting the items crossfade, this is opened using the Edit, Crossfade Editor command or by double-clicking near the top of the crossfade. On the next page you can see the crossfade editor open. The crossfade area has been selected (by clicking anywhere on the crossfade curve). The crossfade editor displays the fade parameter information for the selected media items. Use a copy of your project file to experiment, until you become familiar with the many controls. Let’s first introduce the basic, or essential, features, before examining the more advanced ones.
Crossfade Editor: Basic Controls
- The four arrows (left, right, up, down) are used to select the previous/next crossfade on the same track, or to move to work with crossfades on the previous/next track.
- The fader units can be set to time (seconds), beats, H:M↓F, or samples. Shown overleaf it is set to beats.
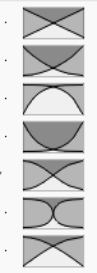
- Any of the seven shapes shown (above right) can be selected for fade out, fade in, or both together After choosing a shape, you can use the mouse directly on the crossfaded media items. Drag either curve left/right to adjust the fade, or at the diamond intersection to move the point where the fades cross and thus both fades simultaneously.
- To adjust the start/end position of the crossfade, hover the mouse over its left/.right edge and
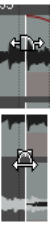
drag left or right. Placed over the item edge it will adjust only the start (left edge) or finish (right edge) only, a shown top right. Placed between the two items it will adjust both the crossfade start and finish simultaneously as shown bottom right.
- The position of the media items shown inside the crossfade editor window can be adjusted by
dragging them left or right.
Crossfade Editor: Digging Deeper
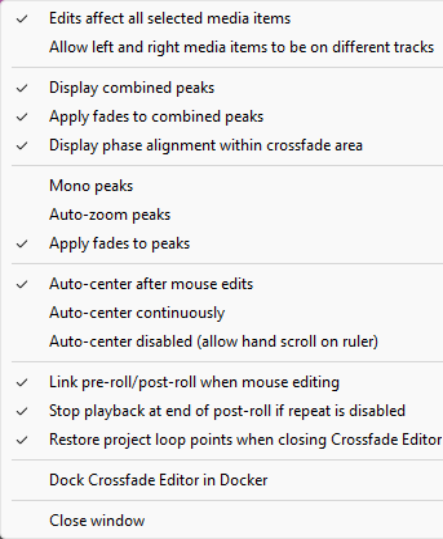
Click on the Options button to open a context menu (see below). You have options for Edits to affect all selected media items and to Allow left
and right media items toe be on
different tracks. The next two commands add a lane showing the effect of applying the crossfade to the two items. An option box enables you to Link fade in/ fade/out edits. This effectively locks the center of the crossfade in place so that as you adjust the starting position of the crossfade the end position is adjusted by an equal amount. However, if you Lock left hand start then you can adjust the end position without the start position changing. The Display phase alignment option causes any phasing issue to be displayed, as shown here. The Phase align button is used to specify whether you want phase alignment issues corrected by adjusting left item position, left item contents, right item position or right item contents,. Immediately above the visual display you can choose to show crossfade length (as in the example above), fadeout (start, end or length), fadein (start, end or length) left volume or right volume. Values can also be entered here – for example, to specify a crossfade length of 4 seconds.
From time to time you might find that your edits have caused the crossfade to get out of sync, The Re-sync can be used to resolve this, by Sync crossfade to media edges, Sync fade-in to fade-out or Sync fade-out to fade-in. Re-center will reposition your crossfade, if necessary, to re-center it. Other menu options are largely self-explanatory. You can choose to use Mono peaks, to Auto-zoom to peaks when editing, Apply fades to peaks, Auto-center [crossfade area) after mouse edits, and/or Auto- center continuously. Alternatively you can Allow hand scroll on the ruler – this disables auto-centrer. Other options are to Link pre-roll/post-roll when mouse editing, Stop playback at end of post-roll if repeat is disabled and/or to Restore project loop points when closing Crossfade Editor.
The Crossfade Editor Transport Bar
Most controls here are self-explanatory. Notice the four buttons – play, pause, stop and repeat. Also: Preroll and Postroll: start playback of the preroll seconds before the crossfade, and continue for the postroll period after the crossfade. Other options are to Solo crossfaded items, and to mute left (pre crossfade) or right (post crossfade). These can be applied in bounds only, out of bounds only, to top lane only, or to bottom lane only.
Snapshots and Presets Taking Snapshots will save your crossfade settings exactly as they are at that time, but only for the crossfade on which you are currently working. Use the Snapshots button to save up to four snapshots as Snapshot 1, Snapshot 2, etc. These can be recalled from this menu.
Presets are global. Current settings can be saved (and named) from the presets button menu. Presets are saved globally and added to this menu, able to be recalled for crossfades in this or other projects as required..
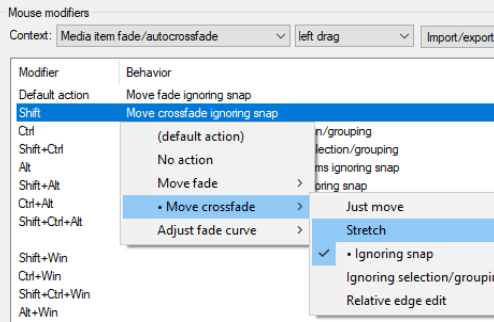
Fade/Crossfade Mouse Modifiers and Actions
Both media item fade intersection and fade/autocrossfade mouse modifiers can be defined separately for left click, left drag and double click actions. The left drag modifiers are of particular interest. The context Media item fade/autocrosfade uses modifiers to manage the intersection itself. These can be used with fades or crossfades, e.g., to enable or disable various options, such as whether to ignore snap and/or selection/grouping, whether to stretch items, or to assign actions (such as adjusting the fade curve). Other options enable you to adjust the fade curve with the mouse. Left click and double click modifiers can be used to apply any of a number of additional fade intersection or auto crossfade actions from REAPER's Actions list. Open the Actions list (Actions menu) and from its Section drop down menu choose Crossfade Editor for a complete list of available actions. These include actions to load presets and snapshots, change fade/crossfade shapes, to adjust curves horizontally only or both horizontally and vertically, for managing crossfades on splits, various pre-roll and preview actions, and actions to modify fades in various ways. Other actions allow you to mute/unmute left item or right item, or to solo crossfaded items. See also Chapter 15. Note also that the Appearance, Fades/Crossfades page of your Preferences includes various options which determine how and when fade/crossfade edit handles are displayed (see Chapter 22). Running the action to Calculate loudness of selected items via dry run render (optionally including take and track FX) will cause that item’s loudness stats to be displayed. For more information about loudness analysis see the JS Analysis Loudness Meter, and for the Actions List see Chapter 15.