16.9 Volume Control with Compression: ReaComp
Earlier in this chapter, we encountered a Limiter.
Kind: concept (user-guide-section) Chapter: 16 REAPER Plug-ins in Action Source: REAPER User Guide v7.70
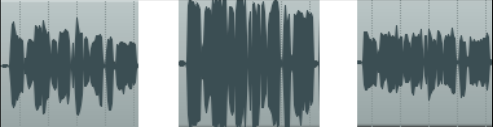
Earlier in this chapter, we encountered a Limiter. You can think of a limiter as being like imposing a ceiling – it stops the volume of a signal from going above whatever level you set. Because limiting can be harsh, it is often better to use a compressor on individual tracks. Think of it this way – a simple limiter cuts in suddenly and severely, whereas a compressor can be eased in much more gently. It might help to get a visual picture of what limiting can do to a recording compared to a well applied compressor. The three illustrations show the same waveform first as recorded, then how it might look with limiting (center), and with compression instead of limiting (right). Notice that on the original waveform the volume varies considerably from time to time. Applying a limiter can lift the quieter passages, but may make the overall effect too loud. The dynamics might be largely squeezed out of the song. The illustration far right shows the same waveform after carefully using a compressor instead of a limiter. The track no longer clips, and more of the dynamics of the recording have been preserved. Software compressors vary from the simple to the complex. We’re going to concentrate here on just six essential controls. There are other factors, but let’s just focus on these six for now.
-
Threshold - This is the volume at which the compressor will kick in. For example, if you set your threshold at, say, -10dB, then nothing below that threshold will be compressed.
-
Ratio – This determines how gently or severely the compression is required. A relatively harsh ratio like 2 to 1 would ensure that for every 2 decibels the volume of the recording goes above the threshold, the sound will be increased by only 1 decibel. A more gentle ratio such as 12 to 1 would mean that for every 12 decibels the recording goes over the threshold, the sound will increase by only one decibel.
-
Gain – Adjusts the volume of the track after compression. Often you will want to raise the overall sound at least a little, to prevent the overall volume of the track from now being too quiet. The gain control in ReaComp (above) is labelled Wet.
-
Wet/dry rotary (top right). Determines how much of the unprocessed signal is mixed with the processed signal. Fully right (as shown) this will be 100% wet: fully left will be 100% dry.
-
Bypass – this is the small tick box
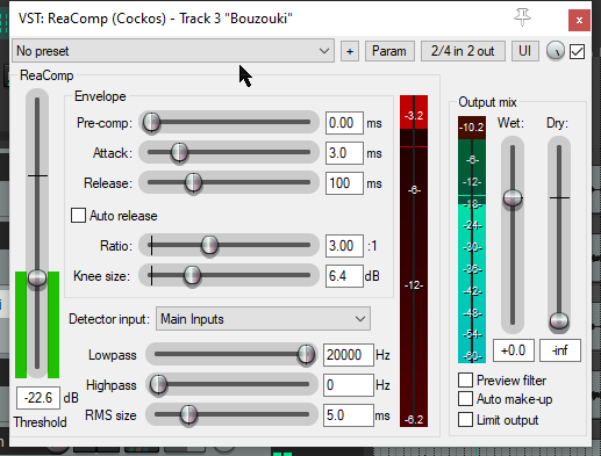
in the top right corner, next to the wet/dry rotary. When this is ticked the plug-in is active. When unticked it is set to bypass.
- Limit Output (bottom right) – This option will prevent the compressor output from exceeding 0 dB. Note also the three controls attack, release and knee size. These help to control how the compression is shaped and applied. Attack determines how long the compression takes to reach its full effect. The release setting determines how quickly the compression will be removed when the signal falls below the threshold. Knee determines how sharply or gradually the compression is applied. For other more advanced controls, see the free ReaEffects Guide: