8.1 Using Item FX with Individual Takes
In Chapter 3 we saw how to create multiple takes when recording.
Kind: concept (user-guide-section) Chapter: 8 Managing, Comping and Editing Takes Source: REAPER User Guide v7.70
In Chapter 3 we saw how to create multiple takes when recording. In particular, make sure you are familiar with the sections that cover Displaying multiple takes, Using Color Coded Takes and Working With Multiple Takes. Editing techniques covered in Chapter 7 can be applied to editing a project with multiple takes. You have two main methods at your disposal. You can:
- Explode all takes to new ordinary tracks. You can then work on and edit each track separately and (if you wish) join them all back to a single track when you have finished, or
- Explode all takes in place to fixed media item lanes. Fixed media item lanes will be considered from section 8.12 onwards.
- Work on and edit the various takes all within the single track on which they were recorded. We'll get to this method later in this section. Unless stated otherwise, the examples in this section assume that you have free item positioning and fixed item lanes disabled for your tracks, and in preferences (Project, Track/Send Defaults). This is the REAPER default.
Note: Most of the images shown in this chapter use the REAPER 5 color theme: the instructions, however, are exactly the same regardless of which theme you are using.
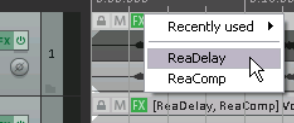
In Chapter 7 you learnt how FX can be added to individual media items. Where multiple takes exist on a track, each take can be assigned its own FX and FX chain. You can insert separate FX plug-ins into individual takes, as shown in the example here. Select the required take, then press Shift E to open the take add FX window. If you have enabled the options Display media item take name and Draw labels above the item (both under Preferences, Appearance, Media), then any FX chain for the currently selected take will be included in the information displayed. In the example shown on the right, Take 2 is currently active: the FX names displayed are those FX assigned to Take 2. If you wish, you can insert the same FX into each take and apply different parameter settings for each one.