13.49 Using MIDI CC Messages to Control FX Presets
This is an advanced topic and as such not recommended for novice users.
Kind: concept (user-guide-section) Chapter: 13 Working with MIDI Items Source: REAPER User Guide v7.70
This is an advanced topic and as such not recommended for novice users.
Bank/Program Select CC messages can be used to switch programmatically between presets for any FX on any track during playback in real time. This can be done using a dedicated MIDI item that is placed on the same track as the media item containing the FX whose presets you wish to automate. The procedure can be a little bit “fussy” so be prepared to take your time over this, especially at first, until you get used to it.
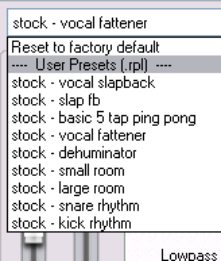
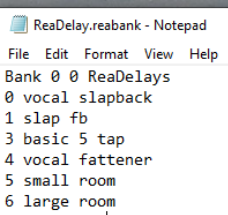
- After recording the item, insert the required FX into the track's FX chain and (if it is not already displayed) import the required preset library. To do this, click on the + symbol to the right of the presets drop down and choose Import preset library (.rpl). 2. The available presets can now be displayed from the presets drop down list. The example here shows the default presets library for ReaDelay, but you can do this for any plug-in. You could delete any presets that you do not wish to keep and/or create and save more presets of your own if you wish. The self-evident commands for doing this can be found on the same presets + menu that you used in step 1. above. If you do this, it is recommended that you then export the presets library with a new name. For the purposes of this example, we will be content to use just the supplied set of ReaDelay presets shown on the right. 3. You now need to create a .reabank patch/bank file. This is in fact an ordinary text file, but it must be laid out in a certain way, and it must be saved with a .reabank extension. You can use any text editor for this. 4. Joel Sampson has available (free of charge) on his web site an excellent and comprehensive five page PDF manual explaining just about every aspect of reabank files and how to create them. Summary instructions follow below, but I would strongly recommend that you download and study The Art of Reabanks from www.djemberecords.com/reaper.html 5. An example of a reabank file for the default ReaDelay preset library is shown below. In this case, Notepad has been used to create the file. Note the comments at steps 7 and 8. 6. The bank line is the first line of the file. It sets the most significant byte (MSB) and least significant byte (LSB) of the Bank Select number, then the bank name. You can set both numbers at zero. 7. Each subsequent line consists of a patch number (starting at zero) and \name, which is shown here the same as the name displayed in the FX presets drop down. However, you may use different names if you wish, as the selection process is based on the patch number. 8. Save the file and close the text editor when finished. A sensible place to save to is in a subfolder of your \Application Data\REAPER\Data folder or equivalent (depending on whether you are using Windows or Mac). 9. Start REAPER and open the appropriate track's FX chain. Select the FX. From the preset + menu select Link to MIDI program change and select a channel (e.g. Channel 16). 10. In the track's context menu, set Free item positioning on to ensure that
you can place two or more items underneath each other on the same track.. This command will now appear on this menu with a tick beside it. 11. Select the track with the media item whose FX plug-in presets you wish to control. Make a time selection
that includes this item. Now from the Insert menu choose New MIDI item to create an empty MIDI item alongside (parallel to) the existing media item. The result of this is shown below:

-
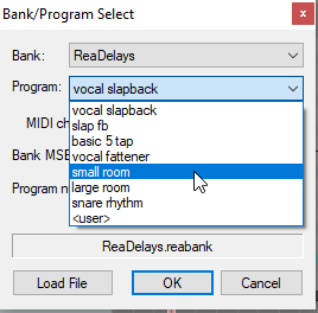
Open the empty MIDI item in the MIDI Editor. Ensure that the Bank/Program Select lane is visible. 14. At the point where you want to make your first automated preset change, double-click in the Bank/Program Select CC lane. This will display the Bank/Program Select dialog box. 15. Click on Load File. Navigate to and select the file that you saved at step 9. and click on Open. 16. The preset bank will now be loaded. Display the Program drop down list and select the required preset (see right). Be sure to select the same channel as you specified at step 10. Click on OK.
-
Repeat step 16. as many times as you wish to create as many
automated preset changes as you require.
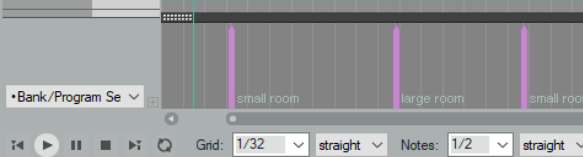
- You should now be able to see your program changes displayed
in the MIDI Editor CC lane (see below).
- Play the song. Your ReaDelay presets will now automatically
change according to your instructions!