21.10 Rendering Regions
Defining your region rendering requirements can use a combination of three possible windows: Render to File, Region/Marker Manager and Region Render Matrix.
Kind: concept (user-guide-section) Chapter: 21 Exporting Files, Mixing Down and Rendering Source: REAPER User Guide v7.70
Defining your region rendering requirements can use a combination of three possible windows: Render to File, Region/Marker Manager and Region Render Matrix. For the most part you will not need to use all three together, but it will help you if you understand how these three windows can work together. Of course, there are many reasons why you might wish to use and work with regions without rendering them as regions. However, there are other circumstances when you might wish to do this. After making your choices in the Render Track List column of the Region Render Matrix you could go to the Render to File dialog if you wish, selecting Region render matrix or Region render matrix via master as appropriate, with bounds set to All project regions. However, there can be advantages in taking your Render Track List specifications (for example which regions to render and which tracks to include) into the Region Render Matrix where those choices will automatically be reflected, as i shown here. The Region Render Matrix, presents you with a further options as well as offering a direct route via a button to the Render… dialog. You can access this directly from arrange view, without needing first to visit the Region/ Marker manager. Thus, it can be accessed in any of three ways:
- From the main menu choose File then Region Render Matrix, or
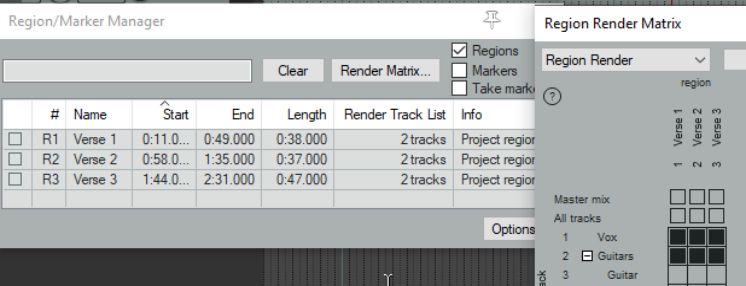
- Click on the Render Matrix... button in the Region/Marker Manager window.
- In the Render to File dialog (File, Render...), select Region render matrix from the Render drop down list, then click on the Region Matrix... button (see below right).
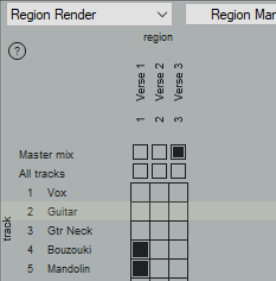
To understand how this matrix works, look at the example below right. It uses a simple project of five tracks (including a folder). The song includes three regions – Verse 1, Verse 2 and Verse 3 . In the first column (Verse 1), two guitar tracks (tracks 4 and 5) are checked. This would result in two files, one for each of these tracks, being rendered for Verse 1. If we had checked All tracks, a separate file would have been rendered for each track, including the folder – five tracks in all. In the second column (Verse 2) nothing is checked: this verse will therefore not be rendered. In the third column, Master mix is checked, resulting in just one file being rendered for Verse 3 – a master mix of all tracks. Within the Region Render Matrix, you can also click on the ? symbol (top left corner) to open a Help screen with more information. Remember, selections can be made in either the Region Render Matrix or the Region/Marker Manager – the other one will be automatically updated, as shown here:


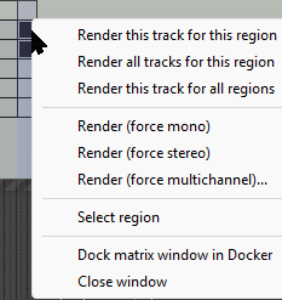
The Region Render Matrix rightclick menu offers some useful shortcuts for selecting what is to be rendered and other options. This saves you having to keep clicking within the matrix to make your selections.
Render this track for this
region does what it says.
Render all tracks for this
region will render all tracks in this region to a single file. Render this track for all regions will render all regions for this track to a single file. Render force mono/stereo/multichannel will render in the selected format (mono, stereo or multichannel) whichever choice you make from This track for this region, This region, or This track. For multichannel rendering you will need to specify the number of channels. Select region simply selects the region. You can choose to Dock or Undock the matrix window in the docker. After masking your choices, clicking the Render… button will open the Render to File dialog, then select Region render matrix and All regions. Output format, etc. are specified in the usual way. Use a backslash in the file name to create subdirectories. For example, a file name $project$region- $track will include project file name, region name and track name in the output files, with each region's files being allocated its own sub-directory. The file name $project$track-$region would include project name, track name and region name, with this time a separate subdirectory for each track. When ready, choose **Render xx files...**or Queued Renders... to proceed.
Tip: The action list includes an action Region: Select/unselect all regions for rendering.