2.4 Using the Track Controls
First, make sure that you are using REAPER’s default theme – to do this choose Options, Themes, Default.
Kind: concept (user-guide-section) Chapter: 2 REAPER Project Basics Source: REAPER User Guide v7.70
First, make sure that you are using REAPER’s default theme – to do this choose Options, Themes, Default. As things stand, when you play back a project the same sound comes out equally from both speakers. That’s because no adjustments have been made to any track's Volume or Pan controls. Which faders are visible in the track panel is determined by your chosen track layout: in these examples, the default Layout A has been used: with the mixer closed, all controls are visible. If, despite this, some controls are still not visible, you might need to enlarge your track panel. Hover the mouse over the panel’s right edge and left drag out to the right.
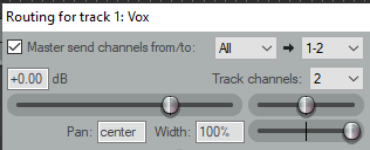
Clicking on a track’s Route button reveals that by default all output goes to the Master via parent channels 1/2. If this is not so, adjust the track settings accordingly and check that your audio device output settings are correct. The first rotary fader shown here adjusts a track’s volume. With some layouts, this is shown as a horizontal fader. The other rotary adjusts the panning, sending the signal more to the left or the right as preferred. If you see a second pan control, ignore it for now. This is used with some pan modes to control stereo width, a more advanced concept covered in Chapter 11. To adjust any horizontal, vertical or rotary faders in REAPER, you can:


- Left click-drag faders in the direction required, releasing the mouse when finished. For rotary faders, drag up to rotate clockwise, down for anti-clockwise. Hold Ctrl while doing this for more subtle adjustments.
- Hover your mouse over the fader, use the Scroll Wheel to adjust the level down/up. To enable this feature, go to Options, Preferences, Editing Behavior, Mouse and deselect Ignore mousewheel on track panel faders and on all faders. See also mouse behavior preferences in Chapter 22.