5.13 Track Folder Essentials
When a number of tracks are collected into a folder, you will probably want to use both the individual track controls and the folder controls.
Kind: concept (user-guide-section) Chapter: 5 Project Arrangement Basics Source: REAPER User Guide v7.70
When a number of tracks are collected into a folder, you will probably want to use both the individual track controls and the folder controls. For example, you can use the Volume controls for individual tracks within a folder to set the volume levels for the different tracks relative to each other. You can then use the Volume control for the folder itself to control the overall combined volume level of the tracks in that folder. In fact, you can use all of the folder track controls (mute, solo, etc.) to manage tracks within the folder.
The example shown (below right) shows that a folder called Guitars has been added to our All Through the Night project. This folder contains the two guitar tracks. The faint peaks that you will see in the folder's lane in arrange view represent the combined contents of the folder's child tracks. This can be disabled on your Preferences, Appearance, Peaks/Waveforms page. Identify the little icons that you can see below the track number of each item in the track control panel. These are used to determine a track's folder status. Identify each of these three states:
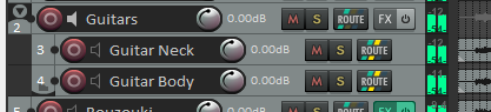
- An ordinary top level track (the default). The icon shows a faint image of a folder. Hover the mouse over this image and it changes to a**+** sign.
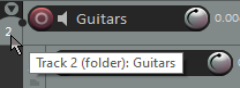
- A folder track. This is displayed as in the Guitars track above, as a stronger image of a folder. Hover the mouse over this image for a tooltip (above right).
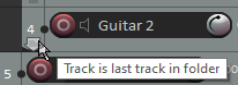
- The last track in a folder. A folder icon is shown and the track is nested. Hover over this icon and it displays a tooltip (right).
If you need to restore a folder to being a normal track, click on the folder control icon as many or as few times as are required to cycle thru the various options until you see the one that you want. You can click on this icon to set a track's status. Let's look at an example.
Example (Optional)
Open the file All Through The Night and save it as All Through the Night FOLDER. Select track 1 and press Ctrl T to add a track below this, as track 2. Name this track Guitars. Click on the track’s + button once to make this track a folder. Click on the Gtr Neck track’s + button twice to make it the last track in the folder. Save the file.
Note: For child tracks enclosed within a folder – as in the above example – the parent will be not the master but the folder track. Their output will by default be directed to the parent (folder) track (where, for example, FX can be applied) and from the folder track to the master.