9.10 Regions and Markers: Ruler Lanes
Before exploring how rows and lanes can be used to manage the display of markers and regions on your ruler we need to understand some basic ruler management techniques. Region and marker placement: By default, REAPER will try to display….
Kind: concept (user-guide-section) Chapter: 9 Tempo Based Production, Loops, Markers and Regions Source: REAPER User Guide v7.70
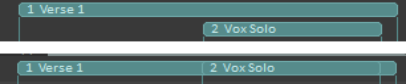
Before exploring how rows and lanes can be used to manage the display of markers and regions on your ruler we need to understand some basic ruler management techniques. Region and marker placement: By default, REAPER will try to display regions in a single ruler lane, and markers in a lane underneath. However, provided the ruler height is sufficient, when regions overlap a second region row underneath the first will display the overlapping region. If there is insufficient row height they will be placed one on top of the other. To fix this, you should increase ruler height. To adjust ruler height, first hover the mouse over the boundary between the ruler area and the top of the first track, (shown right). You can then drag the boundary up or down as you wish. Often this default behavior will be what you want. However, with more complex projects, you might need more control over your region and marker layouts. We explore this in the next section!
Ruler Display Preferences
The ruler Ruler/Grid appearance page of your preferences (Options, Preferences, Ruler/Grid appearance) includes the following display options, and more. Familiarise yourself with this page.
Display regions/markers with square or round edges (as preferred) Display region number/name when region edge is not visible Display selected regions in front of unselected regions when overlapping