11.6 Working with Sends in the Mixer
Enabling the Show sends when size permits option from the Mixer menu will cause your existing sends to be displayed, each with a small rotary fader to enable you to adjust the send volume level directly from the mixer panel.
Kind: concept (user-guide-section) Chapter: 11 The Mixer and The Master Source: REAPER User Guide v7.70
Enabling the Show sends when size permits option from the Mixer menu will cause your existing sends to be displayed, each with a small rotary fader to enable you to adjust the send volume level directly from the mixer panel. Right clicking over an existing send causes a menu to be displayed with the options shown here. Right clicking over an empty part of a track's sends area will produce a menu with only one command – Show track routing window. This can also be displayed by left clicking anywhere on the track's empty sends area.
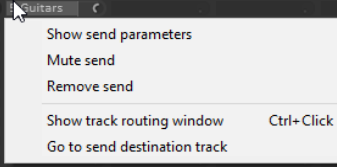
Show send parameters Opens a small window with parameters (volume, pan, etc.) for that send. Mute send Toggles the send's mute status. Remove send Deletes the send altogether. Show track routing window Opens the track's routing window. Go to send destination track Selects the send's destination track**.**
As well as this menu, other options are available for creating, editing and managing your sends. You can drag and drop from the ROUTING button of one track to another (as in the TCP) to create sends, but using the sends area of a track's channel strip for this purpose offers you more options. This can be seen in the following table:
In order to do this ... … you do this
Add a send from one track to another.
Drag and drop from one track's send area or ROUTING button to the other. In the latter case, a send control window will be opened.
Add a send from one track to another and open control window for that send.
Ctrl drag and drop from one track's send area or ROUTING button to the other.
Add a send from one track to another and disable send from first track to the master.
Alt drag and drop from one track's send area or ROUTING button to the other. Use this method to create sends from several source tracks to the same destination track to create a traditional submix.
Add several sends to one track in one action
Select all sending tracks. Hold Shift while dragging and dropping from send area or ROUTING button of any selected track to receiving track.
Add several receives to a track in one action
Select all tracks from which you want the sends to come. Hold Shift while dragging and dropping from the ROUTING button of the receiving track (unselected) to any of the selected tracks.
Copy a send from one track to another
Drag and drop the send to another track.
Delete a send.
Alt click on the send.
Display a context menu.
Right click on any send
Open entire routing window for a track.
Ctrl click on a send or Click in empty part of sends area or Click on the ROUTING button.
Open the control window for a send.
Click on the send – allows you to change volume and/ or pan, specify send/receive channels, mute etc.
Raise or lower the send volume level.
Click and drag on a send’s control knob.
Toggle a send’s mute status on or off.
Shift click on the send.
Add a send from a track directly to an FX (e.g. for sidechaining).
Drag and drop directly from the track's ROUTING button to the FX.
Note that in the above table, those actions which use the routing button can be carried out in both the Track Panel and the Mixer Panel.
Tip: You can create your own mouse modifier shortcuts for many mixer commands and actions (Options, Preferences, Mouse Modifiers).