4.7 Inserting Audio Files, Samples and FX
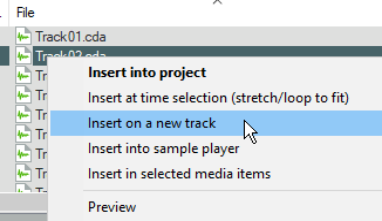
Selected media items can be inserted into the current project either from the media explorer's toolbar, or from the main window by right-clicking on the file name and choosing one of the options (see below).
Kind: concept (user-guide-section) Chapter: 4 Managing Media: The Media Explorer Source: REAPER User Guide v7.70
Selected media items can be inserted into the current project either from the media explorer's toolbar, or from the main window by right-clicking on the file name and choosing one of the options (see below). These are:
Insert into project (on currently selected track, at current cursor position) Insert at time selection (stretch/loop to fit) (if a time selection is currently active) Insert on a new track (at current cursor position) Insert into sample player (on new track, or reusing existing sample player) Insert in selected item (as new take, replacing media source, or replace media source -stretch/loop to fit: when replacing source media only the active take will be stretched) As a shortcut, you can specify one of these options (or something else) as your default behavior, then apply that to a selected item by double-clicking or pressing Enter.
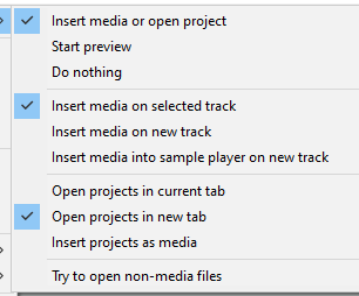
You can set your default behavior preference using the Options, Default action (double-click or enter key) command. This menu is shown here (right). The default settings are to Insert media on selected track (media items) or (for .RPP files) Open projects in new tab. We’ll get to .RPP files shortly.
To disable this shortcut altogether, choose Do nothing. To assign your own shortcuts to any command, go to the media explorer section of the actions list: right-click over the Media Explorer title bar and choose Show action list from the context menu.
Some of these options appear might self-explanatory. For example, Insert on a new track creates a new track and inserts the selected item there, at the current cursor position. Alternatively, we could just drag and drop. Sounds simple? Not always, because we might need to ensure that the item we are inserting syncs with our other instruments. Let’s look at how to use the media explorer to our best advantage in this and other situations.
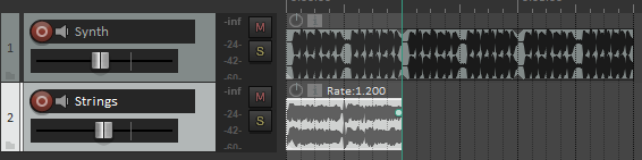
Example 1 – Insert at time selection
Here we have inserted a synth sample and looped it as shown. We wish to add some strings. We find a sample that we like, but it needs to be synchronized with the synth.

We make a time selection equal to the first instance of our synth. We set Tempo match on and then
Insert at time selection
(stretch/loop to fit). The new track syncs with the existing material and can itself be looped.
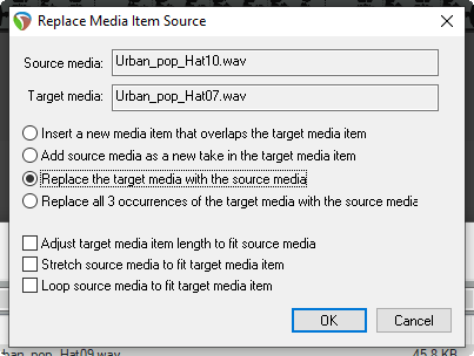
Example 2 - Insert in selected media items (Replace media source)
We have inserted a series of empty media items to mark where we want a hat to go . We select all the media items, choose a sample, and with tempo match on choose
Insert in selected media items, Replace media source (stretch/loop to fit).
This command could be used to replace one sample throughout a song with another.


Example 3– Replace source media using drag and drop
- Select the item in media explorer. 2. Hold Ctrl Alt while you drag and drop to the
media item whose source is to be replaced. Make sure that the start position of the item to be inserted does not occur before the start position of the existing item. 3. The dialog box shown here will pop up. You can
choose Insert new media item that overlaps target media item, Add source media as new take in target media item,
Replace target media with source media
or (if there is more than one instance of the item) Replace all x occurrences of the target media with source media. 4. Specify your preference as to whether to
Adjust target media item length to fit
source media, Stretch source media to fit target media item, or Loop source media to fit target media. When media is dragged into a project, media explorer settings to preserve pitch when changing rate or tempomatching will be respected.
Example 4 – Inserting an item as a new take
In this example, after inserting one sample into a track, a second has been inserted using Insert in selected media items (Insert as new
take).
This item can now be looped, copied, pasted, split, etc just like any other and any desired permutation of the takes can be selected (as shown, for example, below).

Example 5 – Inserting an item as new track immediately above an existing track
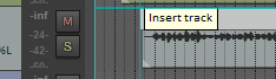
You can drag and drop a media item to insert it on a new track which will be created above an existing one. The Options, Preferences, Media option to Allow drag import to insert tracks needs to have been enabled. Drag and drop the item so that the mouse is hovered in arrange view on and near to the top of the existing item above which you wish to insert it, and at the position in the timeline where you want it inserted. A tooltip Insert track will be displayed. Release the mouse, and the item will be inserted on a new track immediately above the track containing the existing item.
Example 6 – Insert an item into sample player
Selecting a sample and then choosing Insert into sample player (insert sample player on new track) will cause a new track to be created with ReaSamplomatic5000 inserted into its FX chain, pre loaded with the selected sample. To replace the sample with another simply select the track, select the required replacement sample and choose
Insert into sample player (reuse active sample player).
The Options menu includes several options for Assign MIDI when inserting into a sampler. These are:
Assign detected pitch Assign MIDI note C4 (60) and increment if new track …
Assign MIDI channel and increment if new track and Do not assign pitch, note or channel (the default)
Example 7 – Inserting an automation item
Automation items can be previewed in, and inserted into projects from, the Media Explorer in the same way as other media items, and with the same appropriate options. See also Chapter 18 for more information.
Example 8– Insert part of a media item into a project
- In the preview window select the portion of the waveform. 2. Right click over the selected portion and choose one of the
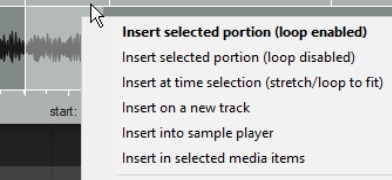
items from the context menu. 3. The item can be loop enabled or disabled. It can be
inserted at a time selection, on a new track, or as a new take on a selected item. Also, a portion can be dragged and dropped into the project, in which case your default settings will be applied.
Note: The Options menu allows you to Enable looping when inserting selected portion of items.
Example 9 - Insert multiple media item into a project
- Use Ctrl click to build your selection. 2. Right-click over the selection and choose from the menu. 3. Alternatively, drag and drop the selection into the project. Unless you have changed the default setting,
you will be prompted to select whether you want the items inserted on one or separate tracks.
Note: The Media page in REAPER’s Preferences includes a default setting when inserting multiple items:
Insert in one track (advancing time) – each is placed one after the other. Insert across tracks – each item is placed in a separate track, all starting together. Decide automatically – if files are of the same length (file size) they will be placed in separate tracks, otherwise they will be inserted sequentially in the same track. Prompt user – you will be prompted each time to specify your preference. If in doubt, set this to Prompt User. Other useful options include whether or not imported media items should be copied to the project media directory. See Chapter 22 for more details. Note also that the action list includes options to set media item start, end or both to match source media.
Example 10– Insert multichannel audio files
Multichannel audio files are imported into REAPER in exactly the same way as any other item. An example of such a file (in this case six channels) is shown here. You can split such a file into its individual channels, to produce one track per channel. This allows for each channel to be edited independently of the others. To do this, right-click on the item and choose Item
processing, Explode multichannel audio or MIDI items to new one channel items.
Example 11 – Inserting an FX chain into a track or item.
Make sure that the option (Show menu) to Show all files is enabled. To add the FX to any existing chain, drag and drop any FX chain to the track panel, or onto any media item to insert the chain into that item. Hold Alt while dragging to replace existing FX with the chain.
Example 12 – Importing tracks from an audio CD
To import material from an audio CD :
- Insert the audio CD into your PC CD drive. 2. Display media explorer, select My Computer in the left panel, then double-click in the main panel on the letter representing CD drive. Its contents will be listed**.** 3. To play (preview) any track from the CD, right click over it and choose Preview from the menu. 4. To insert a CD track into your project as a media item, in media explorer’s main panel right click over that track and choose one of the other commands from the menu. Each of these commands works as explained earlier. Note: By default, fade settings as specified in Preferences, Project, Item Fade Defaults are applied to all imported media items. You can disable this option on the Item Fade Defaults settings page.