15.8 Action List Sections
The different action list sections can be used in different environments.
Kind: concept (user-guide-section) Chapter: 15 Customization: Actions, Mouse Modifiers, Menus and More Source: REAPER User Guide v7.70
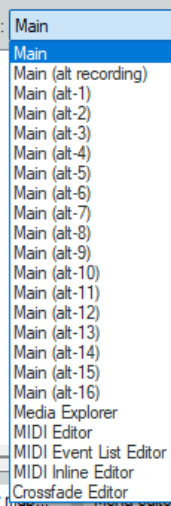
The different action list sections can be used in different environments. In most cases, these present you with the actions (for example, when you are recording) that are most relevant to the particular context. These are Main, Main (alt recording), Main (alt-1 thru Alt-16), lMedia explorer, MIDI editor, MIDI event list editor, MIDI in-line editor and Crossfade editor. Having separate sections for different environments lets you assign the same shortcuts to different actions in different environments. Various combinations of keys could be used in the MIDI editor to select what is displayed in a CC lane. That same set of shortcuts could be used, say, in the MIDI Event List Editor to determine which channels are displayed, and, say, in the Media Explorer to browse thru various folders. None of the assignments that you make in any of the other sections will have any impact on keyboard shortcuts in the Main section. The options for alt-1 to alt-16, however, require further explanation. They allow you to determine keyboard shortcut behavior in various contexts rather than environments. No two people’s needs are likely to be the same, so let’s look at a couple of simple examples. Try not to focus on the actual examples (which might or might not be relevant to you) but rather on the technique. By default S will split selected media items or, if no item is selected, all media items, at the current cursor position. There will be times when this might be what you want, but other times, perhaps at a certain stage of tracking, when you might prefer to use S to solo/unsolo a currently selected track. Likewise, at that same stage of your project you might not yet be ready to worry about markers and will prefer to use M to mute/unmute a currently selected track, rather than create a marker.
Example
You will want to create a shortcut for switching between the different shortcut sections, and also override the REAPER’s default settings where necessary. With any project open, this is how this could be done:
- Open the Actions window. 2. Find the action Main action section: Toggle override to alt-1. Select it. 3. Click the Add button, press Alt 1, then OK, and OK again to Override mapping. 4. With the Actions editor open, from the section drop down list select Main (alt-1). 5. Find the action Track: Toggle solo for selected tracks. 6. Click the Add button, type s in the Shortcut edit box, click OK. Again click OK to Override mapping. 7. Find the action Track: Toggle mute for selected tracks. 8. Click the Add button, type m in the Shortcut edit box, click OK. Again click OK to Override mapping. 9. You could continue to define more custom shortcuts for this section, but we’ll leave it at that for now. 10. Make sure the Main section is selected. Close the Actions editor. 11. Press m. A marker will be inserted. Press Ctrl z to undo**.** Select any track. 12. Press Alt 1. Now press m. The currently selected track will be muted. Press m again to unmute. 13. Press s. The track will be soloed. 14. Press v. A volume envelope is added – this action has been passed through from the main section. 15. Press Alt-1 to restore the main action list..


Tip: You can create custom icons for actions that alternative keyboard sets and add them to tour toolbar. A single mouse click would then be all that was needed to toggle these sets on and off.
Note: In the above example, we have defined the keyboard shortcut Alt 1 to toggle keyboard shortcuts between Main and Main (alt-1) but we don’t seem to have added this definition in the alt-1 section as well. This is because any and all keyboard Main section shortcuts that are not defined in an alternative section are automatically passed thru to the alternative sections. In this case, for example, Ctrl S in the Main (alt-1) section would still save the project, Ctrl Z undo, and so on.