7.20 Ripple Editing
Usually, when you delete part of a media item, a gap is left on the track where the deleted item used to be.
Kind: concept (user-guide-section) Chapter: 7 Managing and Editing Media Items Source: REAPER User Guide v7.70
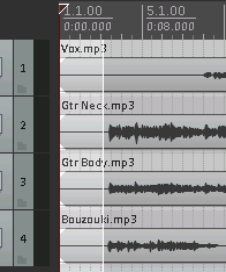
Usually, when you delete part of a media item, a gap is left on the track where the deleted item used to be. With ripple editing, the material on the track is moved over to fill that gap. This is illustrated in the three screen shots below.


This first picture (left) shows a media item selected with a time selection highlighted.

With ripple editing off, deleting the selected area of the selected media item has the effect shown here.

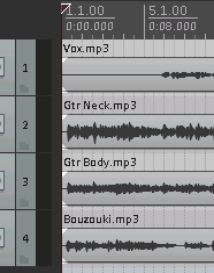
With per track ripple editing enabled, deleting the selected area of the selected media item has the effect shown here.

Two ripple editing options are available on the Options menu, or by right-clicking on the ripple edit button on the default toolbar. These are Ripple edit per track and Ripple edit all tracks. By default, both of these are off. Either one or the other (but not both at the same time) can be turned on from this menu.
Both off: In this default mode items will not shift when you edit a track. Ripple edit per track: With this enabled, ripple editing will be applied when you are editing the currently selected track(s) but not to any other. Ripple edit all tracks: If this is enabled, all tracks will be subject to ripple editing. This means any editing you do to any of the items on any track will also be applied to all other tracks. This can be used, for example, for deleting entire sections of songs.
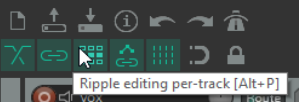
The keyboard shortcut Alt P cycles between the three ripple editing modes, as can the Ripple Editing button on the default toolbar. The right-click menu on this button also includes the options Ripple edit all affects tempo map and Add edge points when ripple editing or inserting time. By default both are disabled. In this mode, markers and automation are locked to the items that they relate to, so as you move items the associated markers and automation move too. Using this mode on multiple tracks is very useful for editing multitrack recordings of live material - everything that belongs together stays together in sync as you edit. For instance, if you split the item at a couple of places (so you now have three items) then delete the middle piece, the remaining pieces join up, but unlike with a normal stereo editor, you can adjust the join by dragging the ends of the items appropriately. If you want to move material from one place to another, you can split at the insertion point, drag the material to the right of the insertion out of the way, then make the insertion and drag the displaced material to join it.
All items to the right of the dragged item will stay together: markers and automation will also move.
Below is shown an example with ripple editing on all tracks. Ripple Editing, all tracks is enabled. In the first picture the silence before the music starts is selected. The command Cut selected area of items is then applied. The selected area is cut from all tracks, and the remaining material is moved to the project start. Note 1: Complications can arise if locked items are included in the selection that is to be ripple edited. In particular, REAPER needs to know whether the ripple editing should be applied to the locked items. The Editing Behavior preferences page includes options for dealing with this – see Chapter 22. Note 2: Complications can arise when ripple editing if your project includes tempo changes. To ensure that these changes are moved with your material, right click on the ripple edit icon on the toolbar and choose Ripple edit all affects tempo map. Note 3: Right click the ripple edit toolbar button for a number of further options such as whether to apply ripple editing When editing media item edges, and Whether to affect envelopes on all tracks.
Tip: Shortly we will get to using mouse modifiers to determine REAPER’s behavior when an item or item selection is dragged. This includes applyimg any of the three ripple editing states.