3.6 To Prepare and Record Multiple Tracks
To prepare multiple tracks for recording you could repeat all of the necessary steps as many times as you require tracks, but that might be tedious – and besides, it’s too easy to make a mistake when selecting your audio….
Kind: concept (user-guide-section) Chapter: 3 Recording Audio and MIDI Source: REAPER User Guide v7.70
To prepare multiple tracks for recording you could repeat all of the necessary steps as many times as you require tracks, but that might be tedious – and besides, it’s too easy to make a mistake when selecting your audio inputs. You could end up with one input being recorded more than once, and perhaps another input being accidentally missed out. To avoid this problem, you can follow this sequence:
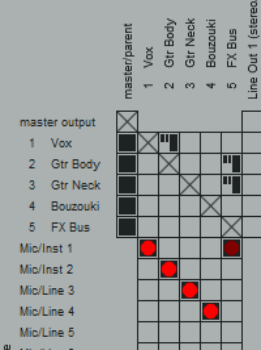
- Use the Insert, Multiple tracks command to insert as many tracks as you require. The Insert tracks dialog will be displayed. Select the number of tracks required and choose to insert them After the last touched track or At end of project. Click on OK. Name your new tracks. 2. Select all tracks to be recorded. After making your selection, click on the Record Arm button of any one of them to arm the entire selection. 3. One method is to use the Routing Matrix (Alt R). Click in the appropriate cells in the Routing Matrix to assign each track to a different input . The example shown uses audio inputs - Input 1 is to go to Track 1, Input 2 to Track 2 and so on. MIDI inputs may also be selected – these are listed below the audio inputs. You can also right click over any red cell to access the Record Input menu should you wish to do so.
- Monitor the strength of the signals and record as before.
Another option is to use the TCP to set up and record your tracks:
-
To define the same record settings for multiple tracks, select the tracks, right-click on the arm record button, then make your choices from the menu. Holding Shift will over-ride this and apply your menu choices to the one track only. Inputs can be assigned to a selection of tracks in a similar way by clicking on the Input button.
-
To assign a series of mono inputs in sequence to a set of tracks, select the tracks then click the Input button of any track in the selection. Next, select Assign inputs sequentially then your required inputs – e.g. in the above example, this would be Mono, Input 1 to Input 4.
-
To insert a new track at the end of your project, you can simply double click in the Track Control Panel area, just below the last existing track.