12.17 Using FX Parameter MIDI Learn
In Chapters 2 and 6 we looked at some uses for the Param button in REAPER's FX plug-in windows.
Kind: concept (user-guide-section) Chapter: 12 Managing The Overall Project Source: REAPER User Guide v7.70
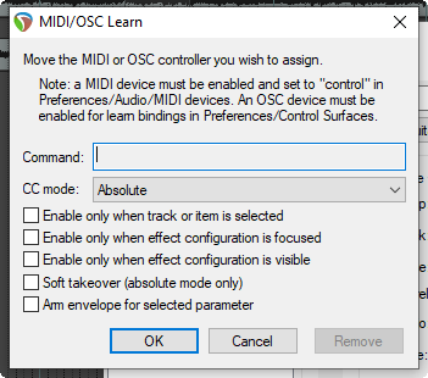
In Chapters 2 and 6 we looked at some uses for the Param button in REAPER's FX plug-in windows. In chapters 16 and 17 you'll see how this can also be used to create automation envelopes and for parameter modulation. In this section, we will explain how to assign control of an FX parameter to an external device. When you touch the control in the FX window with your mouse and then click on the Param button, then choose Learn the Learn window is displayed (see below). Twiddling the control (such as fader or rotary) on your
control surface device will cause information to be displayed in the Command window about the channel and CC assignment for this control. This information is picked up from the control surface. Choice of CC mode (absolute or relative) will depend on the parameter being assigned and your own control device. In many cases, absolute mode with soft takeover will be appropriate, but you may need to experiment. Soft takeover: if enabled, the learned parameter will not be changed by moving a MIDI knob or fader until the MIDI knob/fader equals the value on the screen. For example, if the current value of a parameter is (say) 100 and the controlling hardware slider is (say) 30, then with soft takeover enabled moving the fader will not cause any change to the parameter value until the value of the fader itself nears 100. If the fader is then moved to (say) 120, then the parameter value will also be moved to 120. The options to Enable only when effect configuration is focused/visible can be used to ensure that this control surface assignment will only be used when that plug-in has focus and/or is visible. This enables you to assign the same control surface fader to any number of different functions with different plug-ins. For example, the same fader used to control EQ gain in one plug-in could also be used to control the threshold setting on a compressor. When one or more parameters in a plug-in has been assigned to a control surface, you will see an extra command on the Param menu – Default controller mappings. This leads to a flyout menu with three options – Use default, Save as default, and Clear default. You can thus use this menu to save these settings as the default for this plug-in, so that these controls will be automatically made available whenever that plug-in is loaded into other tracks.