1.19 VST, CLAP and LV2 Plug-ins
There’s one further Preferences screen you will probably want to visit before you get started – VST Plug-ins.
Kind: concept (user-guide-section) Chapter: 1 Setting Up and Getting Started Source: REAPER User Guide v7.70
There’s one further Preferences screen you will probably want to visit before you get started – VST Plug-ins. REAPER has several pages of Plug-in Preference screens, but most can (at first at least) be left to their default settings. However, if you have a collection of VST and/or VSTi Plug-ins (including VST3), REAPER needs to be told where to find them. Note that VST3 plug-ins should be kept in directories separate from other plug-ins. Choose Options, Preferences , then select VST in the Plug-ins section. You can use the Edit path list… button to locate your plug-ins. This offers you a number of options. Add system VST paths will detect and select those directories used by default for installing many plug-ins. You can also use the Add path... option to identify and add other folders. You can leave most other settings as they are (at least for now). MacOS uses two “built in” folders for installing shared plug-ins. These are Library/Audio/Plug-Ins and Users/
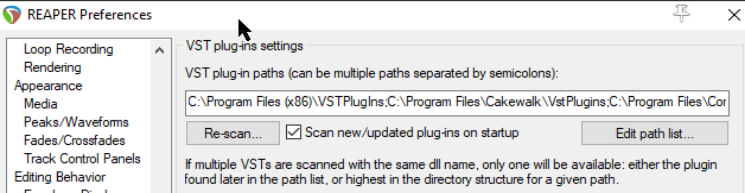
Windows by default uses C:\Program Files\Common Files\VST3, but if your VST plug-ins are spread across several folders it might not be able to locate all of these for you. In this case you may need to use the Add path ... option several times, each time selecting one of your folders. Use the OK button in the Browse for folder window each time after selecting the folder name. Clicking the Re-scan button in the above window will then make the contents of your VST and VSTi folder(s) available immediately. REAPER will also scan any subfolders. Re-scan… button will also check for any listed plug-ins that failed to scan earlier. REAPER will automatically scan your VST folders each time the program is launched. You can also return to this screen at any time and add more VST folders later. Specify the extra location(s) of your VST plug-ins, then Re- scan then Apply then OK to close this screen and cause your new settings to be remembered. You can find more information about the various VST Preferences settings and options in Chapter 22.
VST and VST3: important note: REAPER scans for VST plug-ins according to your directory list, from left to right. If a VST3 plugin is named even slightly differently from its VST version, both will be installed. If both are named identically, only the last one found will be installed. Consider making your VST3 directory last in the list.
Of special use to Linux users, REAPER will also automatically scan for LV2 plug-ins, and install any that it finds. Various options for managing LV2 plugins are available on the Options, Preferences, Plug-ins, LV2/CLAP page.
REAPER also supports Clever Audio Plugin format (CLAP) plug-ins. Options for scanning and installing these are also available on the LV2/CLAP preferences page.