7.36 Dynamic Splitting - Remove Silent Passages
REAPER's Dynamic Splitting has applications beyond tempo based composition, such as to clean up a track and remove any sound from passages that should be silent - for example, with a vocal track, to clean up passages between verses which….
Kind: concept (user-guide-section) Chapter: 7 Managing and Editing Media Items Source: REAPER User Guide v7.70
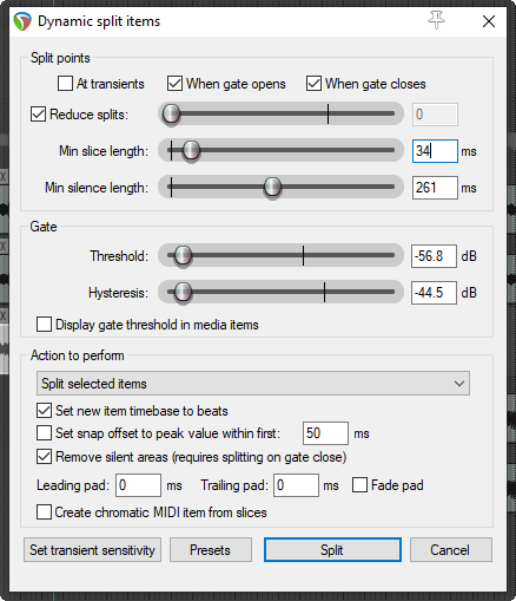
REAPER's Dynamic Splitting has applications beyond tempo based composition, such as to clean up a track and remove any sound from passages that should be silent - for example, with a vocal track, to clean up passages between verses which might contain breathing or shuffling sounds. With dynamic splitting you can tell REAPER to go thru a take and clean up all the passages where the vocalist isn't singing and you want the take to be silent. To do this, first select the media item then right click over it and choose Item processing, Dynamic split items… . You then need to select the required parameters before splitting. Each potential split point is indicated by a colored vertical line and those areas marked for removal are shown as darker. Dynamic splitting will be examined in more detail in Chapter 9, in the context of tempo based music production, but it can also be used as explained in the table below. Start with settings similar to those shown here and adjust then as necessary. When used in this way, dynamic splitting basically employs a noise gate to tell REAPER how often and where to split your media items and which areas are to be removed.
Dynamic Split Option Setting to Remove Silent Passages
At transients
Deselect this when using dynamic splitting to remove silent passages.
When gate opens When gate closes
You would be unlikely to select one of these options without the other. Both of these options need to be turned on, so that REAPER can work out the beginning and end of each passage that is to be removed.
Reduce split
When using dynamic splitting for this purpose this should usually be deselected.
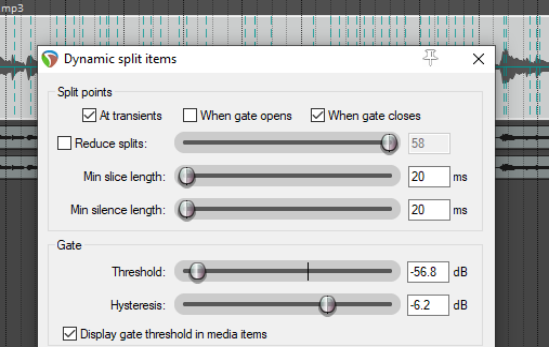
Min slice length
This sets the shortest length for any slice. You will probably need to experiment to get it right. Usually, this should be set to a low value. Happily, REAPER's dynamic splitting interface gives you immediate visual feedback. You can see by looking at the screen when your settings are right. The illustration below shows the effect of setting this value too high. Notice that it can result in some recorded passages also being removed
Min silence length
This is another parameter that will require fine tuning. Set too high it will fail to catch all the periods of silence,
Threshold
This setting is important, but usually has a reasonable range of acceptable values. If made too low, unwanted sounds might pass thru the noise gate. If set too high, you risk deleting quieter passages of the recorded material. Start around -50dB and make any necessary adjustments from there.
Hysteresis
Used to adjust the level at which the gate closes relative to that at which it opens. Setting this closer to or even above 0dB will create more splits.
Display gate threshold in media items
If enabled, this causes faint lines to be superimposed on the selected media items to show the threshold level.
Dynamic Split Option Setting to Remove Silent Passages
Remove silent areas
This option should be enabled. Note that when ripple editing is enabled it will be applied as silent passages are removed.
Fade pads
Enabling fade pads can ensure a smoother transition from/to silence..
Other settings
Leave them as shown here.
Presets
Enables you to save and later recall any combinations of settings as presets.
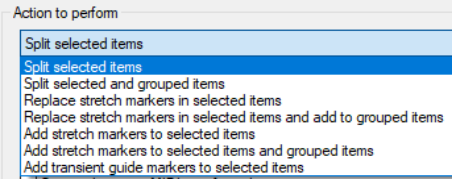
Action to perform Split selected items
splits only selected items.
Split selected and
grouped items. Uses the selected item(s) to determine where on the timeline the split will occur. Also splits any other group members. Replace stretch markers in selected items or Replace stretch markers in selected items and add to grouped items. A group of items is defined by selecting them and pressing G, or by choosing Group, Group items from the media item right-click menu. Add stretch markers to selected items, or to selected items and grouped items: stretch markers are explained in Chapter10. Add transient guide markers to items: causes transients guide lines (vertical broken lines) to be added to selected item(s), without splitting themt.