1.12 Introducing the Track and Track Controls
Tracks are created by clicking on the + sign in the track panel, or by double-clicking in the empty space that surrounds it..
Kind: concept (user-guide-section) Chapter: 1 Setting Up and Getting Started Source: REAPER User Guide v7.70
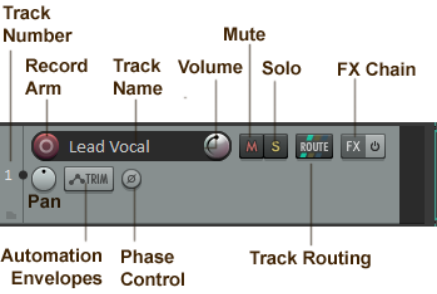
Tracks are created by clicking on the + sign in the track panel, or by double-clicking in the empty space that surrounds it.. Right click for an option to add several tracks. Shown here are REAPER's default track controls and layout. The exact appearance may vary according to factors such as the track height and the track control panel width.
By default, some of the available controls might not be visible in the TCP when you first start REAPER.
This is because some controls are only needed (and therefore only displayed) when you are preparing to record or recording. We'll get to these in Chapter3. The function of most of these controls is self-explanatory, although some (such as mute and solo) can be assigned subtle variations, as you will see shortly. Double click in the track name area to enter a name. The record arm button is used when you nwish to record on to that track. The track routing button opens a window for routing track output to other tracks (such as perhaps an FX bus). The FX Chain can be opened to add FX plug-ins (such as EQ or delay) to a track. The trim button opens the envelope manager where you can add automation for controls such as volume and pan, and for FX parameters. The pan button adjusts the balance between left and right speakers. Phase control is used to invert phase.
Note: By default, the volume and pan controls work with audio items, not MIDI. To change this for any track(s), choose MIDI track controls, Link track volume/pan to all MIDI channels from the right-click menu.