15.23 Customizing the REAPER Menus
You can customize REAPER's main menu and many context menus in a number of ways, including.
Kind: concept (user-guide-section) Chapter: 15 Customization: Actions, Mouse Modifiers, Menus and More Source: REAPER User Guide v7.70
You can customize REAPER's main menu and many context menus in a number of ways, including:
- Removing from view commands that you never use.
- Changing the order in which commands are listed.
- Adding your own custom actions to an existing menu.
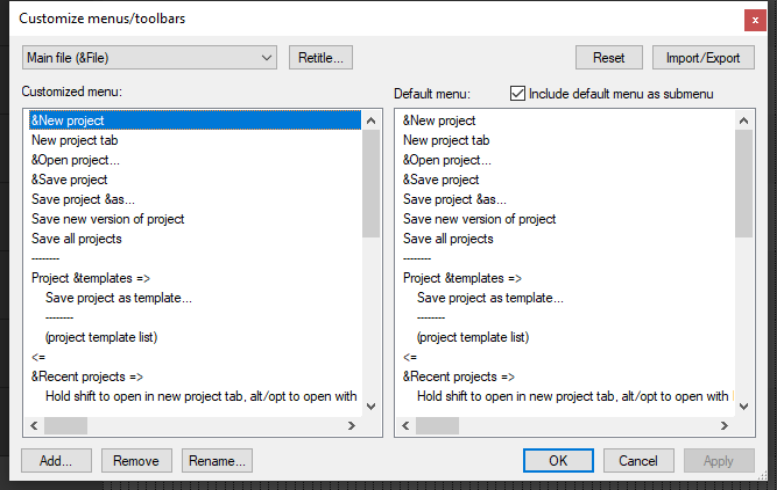
To open and display the Custom Menu interface, choose from the main menu the command
Options, Customize
menus/toolbars. This causes the Customize menus/toolbar window to be displayed. By default, it will open with the Main File menu displayed.
The table below summarizes the main tasks that can be carried out within this window.
For Windows and Linux users, the & sign displayed before any letter indicates that when the menu is displayed, that letter can be typed to select that command. On the menu itself, the letter will appear underscored. Thus, in the example shown above, when you display REAPER's main file menu, the letter N in New project... will appear underscored, and you can therefore type n to select this command.
In order to do this ... … you need to do this.
Select a menu for customization
Display the drop down list (top left of window) and select the required menu.
Change the name of a currently selected main menu command
Select the command. Click on the Retitle... button. Type the new name and press Enter.
Select a command or number of commands to be modified
Click on command in the left pane, or use Ctrl click to build a selection.
Remove command(s) from the currently selected customized menu
Make selection in the left hand column. Right-click and choose Remove from the menu, or click on the Remove button below the customized menu pane.
Change the position of command(s) on the customized menu (left column)
Either … in the left column, drag and drop the command or command selection up or down to its required position. Or … in the left column select the command(s) that you wish to move. Press Ctrl X. Click at the position where you wish them to be placed. Press Ctrl V.
Copy command(s) from one main level menu to another
Select the first main menu from the menus drop down list. Select the required command(s) and press Ctrl C. Select the second main menu from the menus drop down list. Click at the required position in the customized window (left) pane and press Ctrl V.
Add a REAPER action or a custom action to the current custom menu as a new command
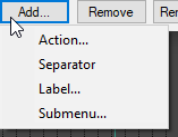
In the left column, click to select the existing command above which you wish to insert your custom action. Click on the Add button, then choose Action from the menu. Select your item from the list then click on the Select button.
Rename a command on the custom menu
In the left column, select the command, click on Rename, then type the new name and press Enter.
Add a separator to the current custom menu
In the left column, click to select the existing command above which you wish to insert the separator. Click on the Add button, then choose Separator from the menu.
Add a label to the current custom menu
In the left column, click to select the existing command above which you wish to insert the label. Click on the Add button, then choose Label from the menu.
Add a submenu to the current custom menu
In the left column, click at the position you want the submenu inserted. Click the Add button, then on Submenu. Type a name then press Enter.
Apply/Save changes made to the current custom menu
Click on Apply button. The dialog remains open until you press OK (to save changes) or Cancel (to lose changes).
Restore the one or all custom menus to the default settings
Click the Reset button, then choose either Reset Current Menu or Reset All Menus.
Export the current custom menu or all menus as a ReaperMenuSet
Click on Import/Export, choose Export All or Export Current, then type a name and click on Save.
Replace the current custom menu or all menus with a previously saved Reaper Menu Set
Click on Import/Export... then select the required menu set file, then click on Open, or drag and drop .ReaperMenu and .ReaperMenuSet files into REAPER from Windows Explorer.
Include REAPER's default menus with your custom menus
Tick the Include default menu as submenu option (top right of window). This is recommended especially if you are removing any default commands from the menu.