7.1 Using an External Editor
REAPER’s native media item editing features are likely to be more than capable of meeting your needs.
Kind: concept (user-guide-section) Chapter: 7 Managing and Editing Media Items Source: REAPER User Guide v7.70
REAPER’s native media item editing features are likely to be more than capable of meeting your needs. However, if you prefer to use a different application for editing you can specify up to two external programs (such as Adobe Audition, Audacity, Wavosaur or Sound Forge) for this purpose. To do this:
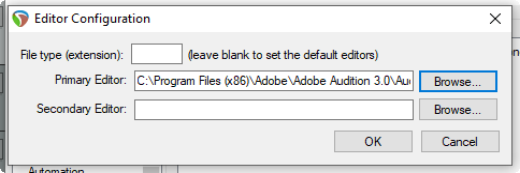
- Choose the Options, Preferences command, then from the left column External Editors. 2. Click on the Add button. 3. Use the Browse buttons (see right) to identify and select your preferred editor(s). 4. Click on OK, then OK to close the 4window. Notice that you can specify different editors for different file types, e.g. WAV, or MP3.
To use your external wave editor:
There are two main ways you can access your preferred external editing program from within REAPER:
- Select the media item and press Ctrl Alt E.
- Right click over the media item. From the menu, choose either Open Items in editor then, from the submenu, select either the option to open the item itself or to open a copy of the item. Unlike versions of REAPER earlier than 4.0, by default double-clicking on an audio media item will no longer open it with your primary editor. This behavior can be changed thru the Preferences, Editing Behavior, Mouse Modifiers page if you wish. Select the context Media item, double-click and change the behavior as you wish. This topic is covered in Chapter 15. If the external editor works destructively on your files then the safer option is to open a copy. This copy will then be inserted into your track when you save it, close the editor and return to REAPER. But first, take a look at some of REAPER’s item editing capabilities …