7.30 Item Channel Mode and Channel Mapping
Select Channel mode from a media item’s properties dialog to see a menu of options.
Kind: concept (user-guide-section) Chapter: 7 Managing and Editing Media Items Source: REAPER User Guide v7.70
Select Channel mode from a media item’s properties dialog to see a menu of options. These include:
- Normal: maintains or returns the stereo item to its original channel state.
- Reverse Stereo: swaps left and right channels.
- Mono (Mix L + R): combines both left and right channels into a single mono channel.
- Mono (Left): produces a single mono channel using only the output from the original left channel only.
- Mono (Right): produces a single mono channel using the output from the original right channel only.
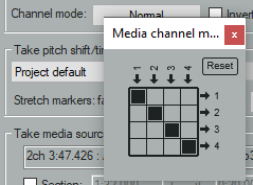
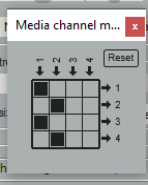
- Mono (3-128) or Stereo (1-128): maps output to a single mono channel or paired stereo channels. For multichannel items (see Chapter 3) you may mix down in mono or stereo to channels other than 1 and 2.Item Channel Mapping The Channel mode menu includes an option Open channel mapper (also in the Actions list). It allows you to map item output to other channels (e.g. 3/4) as well as or instead of the default channels 1/2. For example:
For a track containing several items, to send only some of these items to another track (e.g.) a reverb bus. An example is shown below. When mixing in a surround format such as 5.1 and you wish to send the output to a particular channel or channels.
Example
Suppose a track (say, track 2) contains four items, two of which need to be sent to a reverb bus on, say, track 5. Of course, these could be any two tracks. 1. Use the track routing window to ensure that both tracks (2 and 5) are assigned four channels each, i.e. channels 1-4 (see right) 2. Select the two items in track 2 and press F2 to open their Item Properties window. Display the channel mode menu and choose Open channel mapper (changes take effect immediately). The display should appear as shown above right. By default, any media on each channel will go to its equivalent output – 1 to 1, 2 to 2 and so on. Here we want the media on channels 1 and 2 to go to both 1/2 and 3/4. We therefore change pin connector settings as shown here (right). This 0also adds the JS: Channel Mapper plug-in to each item’s FX chain: this plug-in can be used at any time to adjust any of the channel mapping settings (there’s more about this channel mapper in Chapter 17). 3. Finally, open the track routing window for the Reverb track and add a receive from (in this case) track 2 channels 3/4 to channels 1/2 on this reverb track. Note: If you make a mistake use the Reset button to restore default settings.