15.30 Using a Control Device with REAPER
A control surface can be used to control some of REAPER's actions.
Kind: concept (user-guide-section) Chapter: 15 Customization: Actions, Mouse Modifiers, Menus and More Source: REAPER User Guide v7.70
A control surface can be used to control some of REAPER's actions. You might also be able to use your pedals and other controls on a MIDI keyboard in a similar way. Examples might include track panning and volume, mute and solo status, arming and starting/stopping recording, and possibly to physically map REAPER’s transport bar for functions such as Play, Stop, Pause, Rewind, etc. You will need to know the characteristics of your particular device, including how to install it, set it up and so on. That is obviously outside the scope of this User Guide.
Different control devices have different capabilities. Not all control surfaces can be used to control all actions, even those that are listed as midi CC capable. Obviously it is also beyond the scope of this user guide to present a detailed analysis and comparison of all these. In overview, however, they fall into two broad categories:
- Devices which can be recognised by REAPER as a specific and individually named control surface.
- Generic devices not specifically recognised but which can nonetheless be used as a control surface. If you have a control device of a type listed in the illustration here, first make yourself familiar with its documentation. Next, install the device and its drivers on to your computer in accordance with the manufacturer's instructions. You should then be able to select it on the Control/OSC/Web page of REAPER's Options Preferences settings. Of course, you should consult the manufacturer's documentation and/or web site for further information. You may also be able to find further information on one of REAPER's on-line forums.
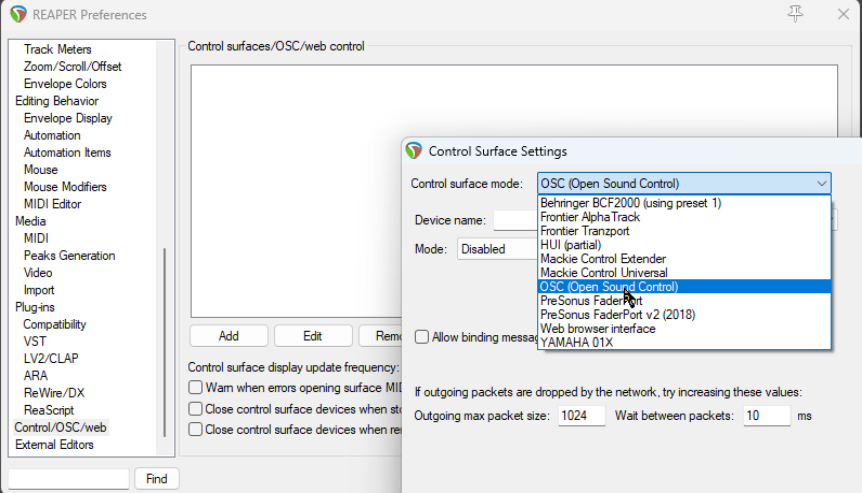
Choose the Options. Preferences command, then select Control/OSC/Web and click on Add to see a list of available devices (see above). The list includes an entry for devices which conform to the OSC (Open Sound Control) protocol. Familiarise yourself with its documentation and characteristics before proceeding. If you choose this option from the list, the screen that then follows will give you the opportunity to specify a device name and pattern configuration. This includes choices such as LogicTouch or LogicPad, or to tell REAPER to write a sample (default) configuration file. This file will contain the default mappings and various appropriate comments. You should also supply a port number (for the transfer of messages) and IP addresses for both the host and the device itself. Go to http://www.cockos.com/reaper/sdk/osc/osc.php to learn more about how REAPER handles OSC and about REAPER's Default.ReaperOSC file. For non OSC control devices not shown on this list, you might be able to install them if they are capable of emulating one of the devices that is listed (e.g. HUI or Mackie emulation). REAPER preferences include options to Warn when errors opening surface MIDI devices, Close control devices when stopped and not active application and Close control surface devices when rendering.
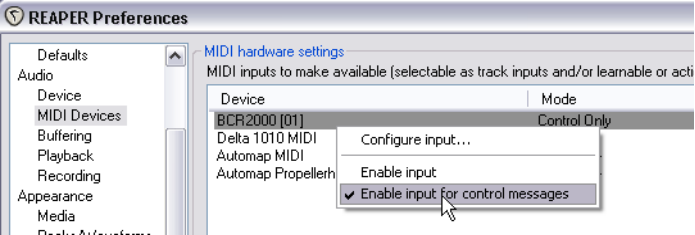
In every case, make sure that you choose the options that are correct for your device from the various Control Surface Settings options. Shown below is one example of such settings, with a Novation Nocturn. This sample screen is not intended as a model for you to use with any particular product. You might wish to install several devices in this way. For example, you might wish to use both a Frontier AlphaTrack and a Frontier Tranzport. This is perfectly possible, so long as each device is installed correctly. You will need to consult the product documentation to ascertain how then your control surface(s) can be used with REAPER. If your device is not on the list of recognised control surfaces and cannot emulate any of the items on that list, you can still use it with REAPER. An example of such a product is the Behringer BCR2000. Once it has been physically set up and installed on your computer, it will appear on the list of REAPER's MIDI Devices. Depending on the actual product and which drivers you are using, it might appear on this list with its own name or merely as a USB Audio Device. Install it as a MIDI Device, most likely Input Only and in most cases for control messages only. An example of this is shown here. You can double-click on the device name to open the
Configure MIDI Input
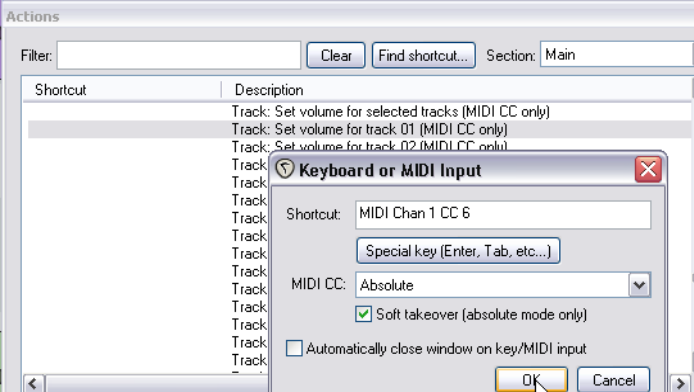
dialog box. What you do next will depend on the device. You might also use this method to use your MIDI keyboard also as a MIDI controller (depending on whether the keyboard supports this feature). Once such a device is installed, you can then assign any action listed as supporting midi CC control to one of the knobs, faders, buttons or rotaries on your control device. The procedure is similar to assigning an action to a key on your PC keyboard. Open the Actions List from the REAPER menu. Select the action, click on Add then instead of pressing a key on the keyboard, tweak the control surface control and click on OK. An example is shown on the right - in this case we are assigning a rotary control to be used to adjust the volume of track 1. For further information, including about the various settings, you should consult the documentation supplied with your device, the manufacturer's web site, or one of the REAPER forums.