21.3 Rendering A Project
The File, Render... command has several applications, including rendering a project down to a single stereo file.
Kind: concept (user-guide-section) Chapter: 21 Exporting Files, Mixing Down and Rendering Source: REAPER User Guide v7.70
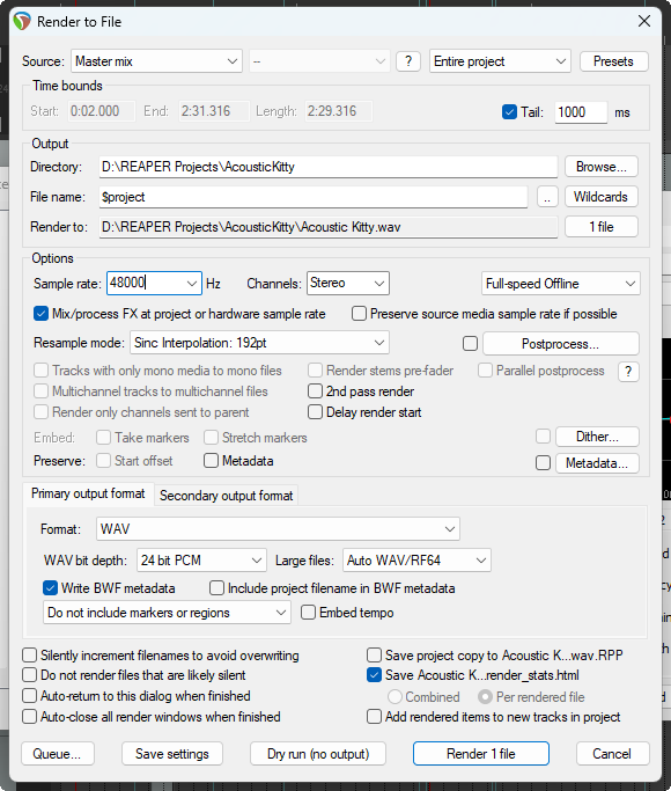
The File, Render... command has several applications, including rendering a project down to a single stereo file. When you have finished your recording and edits, added FX and automation, arranged all your tracks …. now you want to produce an end product for distribution. If you're distributing thru the web, then probably you will need stereo MP3 files. If aiming for an audio CD, you will need one 16-bit stereo wave file for each song on the CD. Regardless of format, each project will ultimately need to be rendered down to one file. The File, Render command (Ctrl Alt R) dialog shows the various options. You must specify a directory and file name: if you wish, use the Browse button for either or both of these. Your other choices will depend on the nature of your material. A summary of Render to File dialog box options follows.
Option Explanation
Source
(and ? button)
See section Rendering to File: Source Options. Note that, depending on which source you select, some dialog box options may be disabled as not relevant. Click on the displayed ? button for more information.
Bounds: options vary according to Source (e.g. bounds options for Master Mix bounds are shown here on right)
Select custom time range (use edit boxes), Entire project, Time selection (made in arrange view), Custom time range (enter start and end times in dialog) or Project regions (selected in Region/Marker Manager or Region Render Matrix). For Entire project, markers named =START and =END (if present) will be used to define start and end of project for rendering.
Bounds: project markers/selected markers
Choosing project markers causes a separate item to be rendered from each project marker to the next. Choosing selected markers causes a separate item to be rendered between each selected marker and the next marker.
Presets button
Opens a menu to save settings as a preset, or load, rename or delete a previously saved preset. Can be Bounds and output, Options and format or All settings. Directory and
File name
Any directory specified in Preferences will be used by default. Otherwise, type in a directory of your choosing or use the Browse button. Use Wildcards to include in the filename data such as track name or number, date/time stamps, etc. (Chapter 21.2.1). Wildcards help is available from the wildcards menu.
Sample Rate
Select a value in the range 8000 to 192000, depending on output format and other factors. Some examples follow in the table after this one.
Channels
Choose mono, stereo or select a number for multichannel output.
On or Off-Line Speed
(see also note below table)
Full-speed (default) for fastest rendering. Others include 1 x offline, online (play mix while rendering), online (idle) and offline x 1 (idle). Idle assigns a lower system priority to the render thread, freeing PC resources for other tasks.
Mix FX
Allows project sample rate to be used for mixing and FX/synth processing.
Preserve sample rate
Preserves source media sample rate if it is possible.
Resample mode
Various options allow trade off between speed and quality. Default is 192.
Postprocess ...
Opens Postprocess Render dialog.
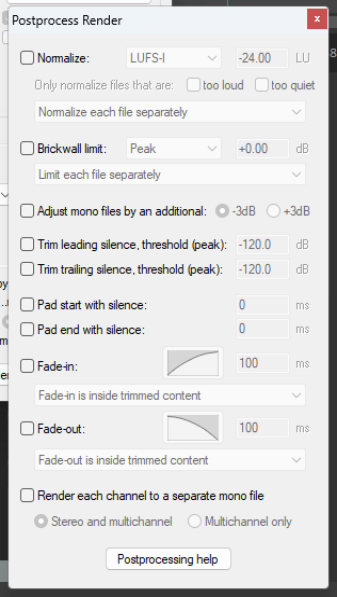
Postprocessing options include:
Normalize to RMS-I, LUFS-I, True peak, Peak, LUFS-M max or LUFS-S max to a target level and/or Brickwall limit to Peak or True peak. Normalize each file separately, to loudest file, or as if files play together.
Also options to:
Adjust mono files by +3dB/-3dB. Trim leading/trailing silence and/or Pad start/end with silence.
Render each channel to a separate
mono file, stereo and multichannel or multichannel only. Fades can be applied (in and/or out) of a length and shape you specify, optionally inside trimmed content. Further info is available there with Postprocessing help.
Tracks with only mono media ...
Enabling this ensures that mono channel rendering will automatically be applied to tracks where all media items are mono or with a mono item setting.
Option Explanation
Render stems prefader
This option is available if the source option includes stems.
Multichannel tracks...
These can be rendered to multichannel files. An example follows shortly.
2****nd pass render
Audio plays once before rendering, so that FX tails (e.g. reverb) are applied.
Parallel postprocess
Enable/disable parallel postprocessing.
Only sent to parent
If enabled, only channels sent to their parent will be rendered.
Parallel render
Click on ? for more information.
Whether to use parallel rendering when rendering files via the master. If enabled, multiple files will be rendered simultaneously (rather than one after the other). For all other source options (not via master) parallel rendering is the default behavior.
Dither button Whether to apply dithering or noise shaping to master or stems. Commonly used when rendering 24 bit (or higher) audio to 16-bit WAV format for audio CD. Creates a smoother transition to the lower sample rate in the rendering process. Can be used on secondary format alone if primary format does not support dither.
Embed markers
Whether to embed take/stretch markers in rendered file(s). Commonly used when rendering 24 bit (or higher) audio material to 16-bit WAV format for audio CD. Creates a smoother transition to the lower sample rate in the rendering process.
Preserve if possible
Preserve Start offset and/or metadata if possible. To Add new metTakeadata click on the Metadata button. The wild cards button within the metadata window includes an option to display wild cards help.
Primary/Secondary output format
Select primary and optional secondary formats for rendering, e.g. to render a file in WAV and another in MP3 format. Choose WAV, AIFF, CAF, Raw PCM data, Audio CD image (CUE/BIN), DDP, FLAC, MP3, OGG Vorbis, OGG Opus, video (Ffmpeg/libav encoder), video (GIF), or WavPack lossless compression.
Format specific options
Other options depend on the format, e.g., for WAV or AIFF files, bit depth, for FLAC encoding depth and data compression level, for MP3 mode and bitrate, and so on. WAV files allow embedded markers and/or regions as cues in the output file(s), and/ or project tempo. The option Include project filename in BWF description is also available for WAV format: it associates rendered files with the source project.
Embed tempo
This option is available for WAV and AIF files only. See section Embedding Transient Information when Rendering for detailed explanation.
Silently increment filenames...
Prevents you from accidentally overwriting an existing file: an incremental number (001, 002, etc.) will be added if an existing file name is used.
Delay queued render to allow samples to load
Resolves problems that can be caused when samples (especially large samples) need to be loaded before rendering.
Save copy of project to outfile.xxx.RPP
Tells REAPER to make a time and date stamped copy of your project file, preserving all settings exactly as they are at the time of rendering.
Do not render ...
Optionally, do not render files that are likely to be silent.
Save all stats ...
Options to save stats for rendered file either combined or individually.
Auto return … Auto close all ….
Automatically return to this dialog box after rendering or Close all render windows when finished. These two options are mutually exclusive. Disable both to keep the dry run render window open when finished.
Add rendered items to new tracks...
If enabled, causes your rendered file(s) to be added to the project as new tracks.
Queue
Add to or open render queue for rendering.
Save settings
Saves the render settings without rendering any files.
Render x files or
Dry Run (no output)
Choose render to render one or more files, according to your options. Choose dry run to “test” render without actually rendering any files. After rendering, you will have the option of playing your rendered file(s).
Note: Online vs Offline rendering: some plug-ins might perform and sound differently if rendered offline.