15.27 Smart Tools and Armed Actions
If you have used other DAW software (such as Cubase, Pro Tools or Sonar) before coming to REAPER, then you might be used to using a toolbar for various editing tasks, such as splitting, deleting or muting items.
Kind: concept (user-guide-section) Chapter: 15 Customization: Actions, Mouse Modifiers, Menus and More Source: REAPER User Guide v7.70
If you have used other DAW software (such as Cubase, Pro Tools or Sonar) before coming to REAPER, then you might be used to using a toolbar for various editing tasks, such as splitting, deleting or muting items. You have already seen that this method of working is not native to REAPER. However, if you wish, you can create your own smart tools whose actions can be armed and used in a way similar to that with which you are familiar. The Actions List includes numerous of actions suitable for this sort of treatment. This example will use the action. Item: Split item under mouse cursor. Other suitable actions include toggle item mute, item properties toggle solo, or to delete items. Without armed actions, any tool which makes reference to the mouse cursor, for example, would otherwise be useless – because the mouse cursor will be over the toolbar, not any media item, when the tool is clicked! By using smart tools we solve this problem. To create a Smart Tool for any action or custom action, you first need to assign the action or custom to the toolbar, as explained in the section before this one. In this example, we have created a button to Split Item Under Mouse Cursor. Then, to use it as a smart tool, simply do this:
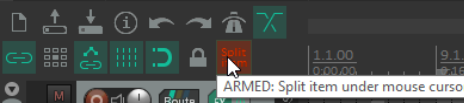
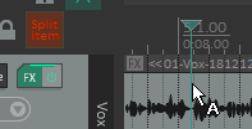
- Right click over the tool. If you hover the mouse there long enough, a tool tip will be displayed. Move the mouse over any media item and it will change to a letter A (indicating that the toolbar action is armed). 2. Left click on (in this example) the item to which you want the action applied, at the exact position that you want the action to occur. In this case, the item beneath the mouse cursor will be split. Once a tool is armed it will remain armed until you “unarm” it. For example, as long as a smart tool to toggle item mute is armed then every time you click on an item the mute status of that item will be toggled on/off. To unarm it, either right click on the armed tool. or press Esc immediately after using it.
Tip: A floating toolbar can be sized (made larger or smaller) by dragging its lower right hand corner in or out – look for the small dotted triangular area. If you want to restrict just how large the icons may become when you do this, enable the option Don't scale toolbar buttons above 1:1 on the Appearance page of your preferences window. There is also an option Don't scale toolbar buttons below 1:1.