14.4 REAPER's Notation Editor: A Closer Look
Once opened, musical notation mode can be selected (View menu) and the option to view the track list should be enabled from the Contents menu.
Kind: concept (user-guide-section) Chapter: 14 Music Notation and REAPER's Notation Editor Source: REAPER User Guide v7.70
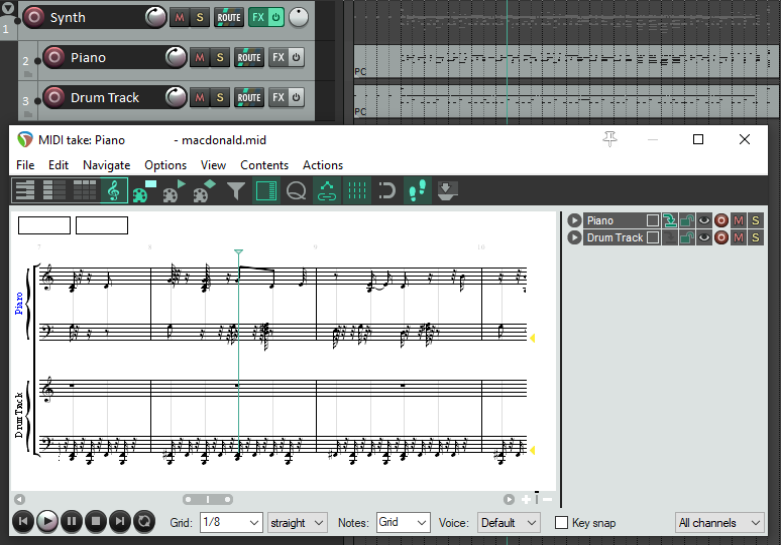
Once opened, musical notation mode can be selected (View menu) and the option to view the track list should be enabled from the Contents menu. This can be used, amongst other things, to determine which items are visible and optionally editable, as well as which is to be used when inserting notes (see 13.27 to 13.29). You should make sure that you have a sound understanding of the track list and its features before working in musical notation view. Shown here is an example of a folder with a synth inserted in its FX chain and two child tracks, each containing a MIDI item. Both are open together in the MIDI Editor's musical notation view. By looking at the panel on the right you should be able to see that both tracks are visible in this window. Both are currently selected as editable: the first has also been selected for inserting any new notes. Let's look first at some of the things that you can already see here:
-
If more than one track is visible, track names are displayed to the left of the staff. Both track and item names are visible in the track list panel. Clicking on the track name (in the notation or in the track panel) will make that track the target track for inserting events, and will make the items on that track editable.
-
Notes that are not currently editable are shown in a lighter shade of gray.
-
There are two boxes at the top left corner of the display, just below the toolbar. If you hover your mouse over any note, these boxes will display that note's time position and pitch.
-
The tempo is displayed above and slightly to the right of the time signature.
-
To the right of the page, at the end of each pair of rows there is a pitch cursor in the form of a small gray triangle. This shows the current pitch that will apply when keyboard actions such as insert note are applied. An accidental (sharp or flat) will be shown beside it if the pitch is not in the current key. This symbol is editable by dragging up or down with the mouse. Now let's take a look at some other features that might not be as immediately apparent. You can see several things in this illustration, which will be explained shortly.
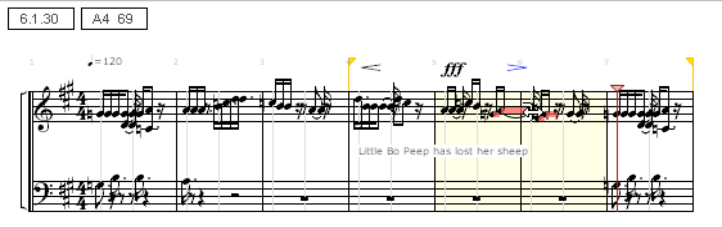
- Lyrics have been added just below the first staff.
- Notations (in this example, crescendo, play very loud, and diminuendo) have been made above the staff.
- A time selection and separate loop selection have been made. This could initially have been done in arrange view, but can also be edited in notation mode. For example, you can grab the handles with the mouse to adjust the start and end points of the loop.
- Some notes are also marked with color. These are the currently selected notes. How they are colored will depend which option you have set – channel or velocity or pitch, etc. Setting color to velocity can be especially useful, as in notation (as opposed to piano roll view) there is no other way to display velocity.
Example
Before digging any deeper, familiarise yourself with the basics of the musical notation mode environment. Make a copy of one of your MIDI projects, then, as a first exercise, strip it back to a few simple MIDI items on no more than two or three tracks. Open this in the MIDI editor and get used to the feel and flavor of musical notation mode. Don't yet be too ambitious: restrict yourself at first to simple tasks like adding or deleting notes, moving or copying loop selections, etc. Get to grips with switching between modes and editing in both. Don't worry if you mess it up occasionally – it's just a scratch pad! We'll get to explaining how you manage the other (and perhaps more interesting) features shortly, but there's a couple of other points worth making first.