21.11 Batch File/Item Converter
You might need to convert files or media items to a different format, for example from .WAV to .MP3, or to a different bit depth or sample rate.
Kind: concept (user-guide-section) Chapter: 21 Exporting Files, Mixing Down and Rendering Source: REAPER User Guide v7.70
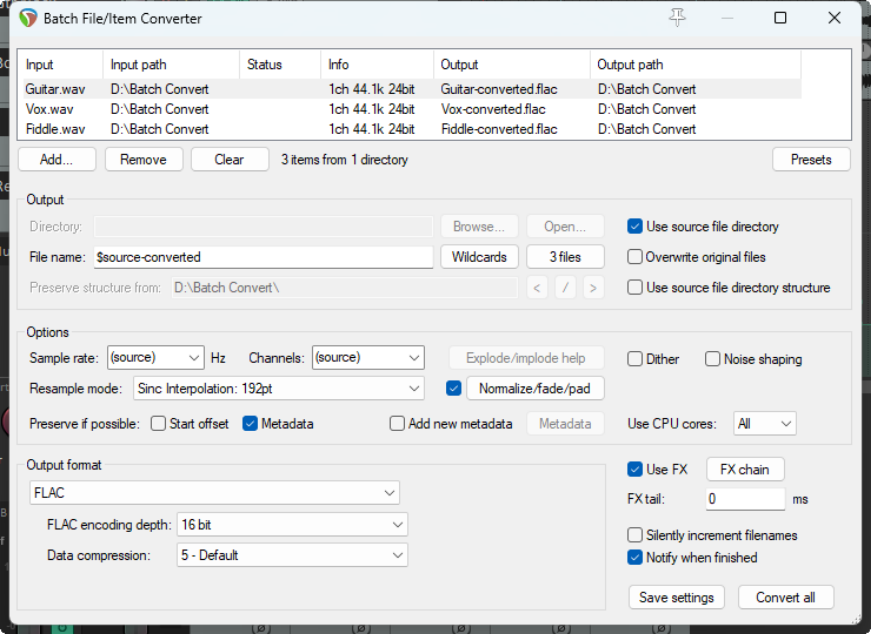
You might need to convert files or media items to a different format, for example from .WAV to .MP3, or to a different bit depth or sample rate. This can be done in one pass. REAPER's batch file converter (File, Batch File/Item Converter ) can be used to do just this. Below is a summary of its options and parameters.
Media Selection
The Add button adds either files to be converted, or selected media items from the current project : data such as channel count, sample rate and bit depth will be shown. Clear and Remove are used to selectively remove files/media items from the list, or to clear the list altogether. Drag up/down to reorder files. Click on any header to sort the list. Presets can be a handy time saver. For example, you can save output settings as a preset.
Output Options
You can accept Source Directory to direct your output to the same directory as the input files, or Browse/ Open explorer to select a different directory. Alternatively, enabling the Overwrite original files option will cause y7our source files to be replaced in their current directory by the rendered file. In addition, the right-click context menu includes options to Add output files to current project and/or Replace input file with output file in current project and/or Open output file in Media Explorer.
File Name

Wildcards can be used to define a naming strategy for your output files. Wildcards are explained more at the start of this chapter, but in brief ... $source-converted will cause the output file to retain its original name followed by the text string “converted”. For example, Vox 1.wav could be rendered to Vox 1-converted.flac. Click the Wildcards button to select any that you wish, e.g. $project for project name, or $length for length.
Options
Sample rate and number of Channels will by default be the same as the source, Thus, a 48 k mono item will
be rendered to a 48 k mono item. Sample rate can be changed by making a selection from the drop-down – e.g. 44100, 96000, etc. Channels options can be rather more complex. Selecting source will cause the rendered item to preserve the
channel structure of the original – mono to mono, stereo to stereo, and so on. Beyond that, Explode/ implode help is available: here are some examples: A mono item rendered to stereo will produce a two channel stereo media item with he original material rendered identically to both channels. A stereo item rendered to mono will produce a single mono media item. A stereo item exploded will produce two separate mono files. A six channel surround sound item exploded will produce six individual mono files, one for each channel. Resample mode.
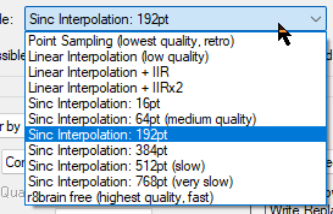
Resampling can impact an item’s pitch, length or tempo: it should only be attempted if you are confident about what you are doing. Should you can make your selection from the dropdown.
Post processing render
Professional audio engineers should note that the Normalize/trim/fade button opens a range of Postprocess render options. These are likely to be of limited interest to casual home users, but in any event Postprocesing help is available. Options include: Normalize peaks, using Peak levels or any of True peaks, LUFS-1, RFS-1, LUFS-MK max or LUFS-S max. You can apply Brickwall limiting, with options to specify a dB level for peaks or true peaks. Other options are to Trim leading silence and to Trim trailing silence. Pad start with silence and Pad end with silence, as well as to select which Fade in/Fade out curves are to be applied. The adjacent checkbox in the batch file converter window toggles all postprocess render options on/off.
Metadata
Metadata is information relevant to the project that can be stored in the actual audio file itself. You can find a fuller explanation, with examples, at the beginning of this chapter. Here you have options to Preserve existing meta data (if possible) and to Add new metadata. CPU Cores. If you know how many cores your CPU has you can specify how many of these want to allocate for your batch processing. The default setting is All. The more cores allocated, the quicker the procesing. Use FX: This option can be used to create an FX chain to be applied when processing. Available Output format settings and options will depend on your chosen output format. Shown in the page above are the settings for FLAC.