8.3 Crossfades with Takes
If you intend to arrange your media items so that they overlap, then you should first decide whether or not you want REAPER to add a crossfade.
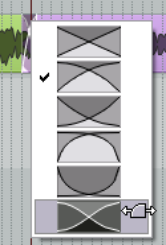
Kind: concept (user-guide-section) Chapter: 8 Managing, Comping and Editing Takes Source: REAPER User Guide v7.70
If you intend to arrange your media items so that they overlap, then you should first decide whether or not you want REAPER to add a crossfade. This feature is turned on and off using the Auto Crossfade button on the main toolbar (or the keyboard shortcut, Alt X). The curves of crossfades can be edited. You can extend the crossfade in either direction by dragging the vertical fade bars. If you hold Shift while doing this, you can move the crossfade itself left or right to a new position. Right-clicking over the crossfade reveals a menu of different crossfade shape options (see left). Using these techniques can ensure that an otherwise abrupt edit is made into a gradual transition at the best edit point. Various options are available to you for customizing mouse behavior when crossfade editing. These can be selected from the Editing Behavior, Mouse Modifiers page of your Preferences – see also Chapter 15. An example of this shown here. For more advanced crossfade editing, you might wish to use the Crossfade Editor (see Chapter 7)