3.5 To Prepare and Record One Track
Before commencing this exercise, make sure that the default track type is set to normal.
Kind: concept (user-guide-section) Chapter: 3 Recording Audio and MIDI Source: REAPER User Guide v7.70
Before commencing this exercise, make sure that the default track type is set to normal. This is how REAPER is set up to work “out of the box.” You can make sure by going to Options, Preferences, Project, Track/Send Defaults and making sure that neither Free item positioning nor Fixed item lanes are enabled.
- Check the Options menu to make sure that Record mode: Normal is selected. We'll examine the other
modes as this chapter progresses. 2. Click on the Record Arm button for that track (on
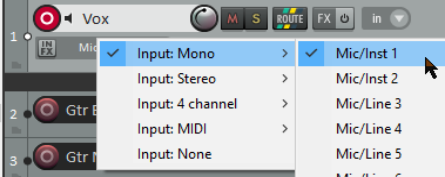
the left) The button should now appear red. If using the REAPER 7 default theme, this will also make the Input settings button visible. 3. Click the mouse over the Input settings for that
track to display a menu. Menu options will be determined by your sound card and audio device(s). 4. Select the required input from the menu. This will be
the one to which the microphone or line that you are using for recording is connected. In most cases, this is likely to be one of the Input: Mono options. If you are not sure which option to pick, choose Mono when recording from a single microphone or lead. 5. By default, Input Monitoring should be on. This is the first item (Monitor
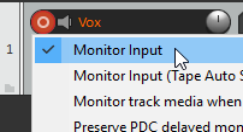
Input) on the Record arm button right-click context menu. If your sound card supports direct monitoring you will probably wish to use that, in which case you should turn off REAPER's input monitoring. Check the sound card's documentation.. If your card does not support direct monitoring, then you should leave REAPER's input monitoring enabled. There's more about input monitoring in sections 3.14 and 3.15. 6. Audition the sound while you adjust the volume on your audio desk or sound input device, so as to get a
good strong signal without clipping. If in doubt, aim to peak at about –10dB. Note that the recording level cannot be controlled by adjusting the Track’s volume fader: that controls only the playback level.
- Press the Record button on the Transport, or use the keyboard shortcut Ctrl R. 8. To finish recording, either press Stop on the Transport, or press Space, or press the Record button again,
or press Ctrl R. Now click on the Record Arm button for this track to “disarm” it. Tip: The Input menu (shown above) includes an item Input: None. This can be used to prevent material from ever being accidentally recorded onto a track where it is not wanted, such as perhaps an FX bus or a folder.
Note 1: If you use the Record button or Ctrl R to stop recording, recorded items are automatically saved. If you press Space or Stop, the dialog box shown will let you save or delete any or all of your newly recorded media items. Note 2: REAPER supports “on the fly recording”. This means you can also arm additional tracks after the recording has started. Those tracks will then also be recorded from the point at which you arm them. Similarly, if recording more than one track, you can stop recording one while continuing to record the others by clicking on the Record Arm/Disarm button to disarm just that track.

Tip: Track/Send Default Preferences. The Track/Send Defaults page of REAPER's preferences can be used specify record configuration defaults for future tracks and projects, including turning input monitoring off and selecting default inputs – see Chapter 22.
Tip: When recording, make sure that the incoming signal is not too loud, or you can damage your recording equipment. Here’s what to do:
- Turn the input or gain control on your input device (e.g. firewire device or desk) all the way down. 2. If recording an instrument in-line, insert one end of the line into the instrument and the other end into
your input device. Turn the output on the instrument fully up 3. Audition the instrument, slowly raising the input or gain control on your input device until it sounds right.