15.19 Mouse Modifiers
We've come across the mouse modifiers page of REAPER's preferences settings several times already.
Kind: concept (user-guide-section) Chapter: 15 Customization: Actions, Mouse Modifiers, Menus and More Source: REAPER User Guide v7.70
We've come across the mouse modifiers page of REAPER's preferences settings several times already. This page is where you can change any of REAPER's default mouse modifier controls and also add more of your own. Some pointers to keep in mind:
- Modifier keys. Windows users can use any of these modifier keys, in any combination, for any mousewheel action: Shift, Ctrl, Alt, Win Mac users may use any of these modifier keys, in any combination: Shift, Command, Option, Control
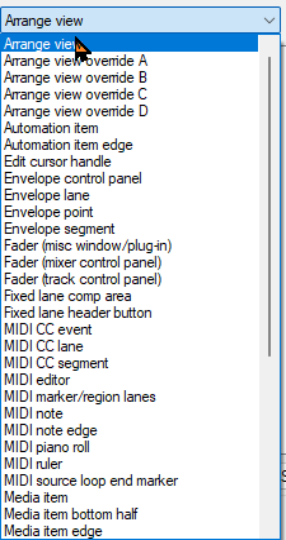
- Contexts. The Contexts drop down list on the Mouse Modifiers page of your preferences window lists the contexts in which you could use your mouse and for which you could need modifiers (see right). When you select an item from this list, current mouse assignments for that context are displayed. For most contexts you will find a number of variations, depending upon the exact kind of mouse action being undertaken. For example, separate mouse modifiers can be applied to media items depending on whether the mouse action being applied is a simple left click (which by default selects the item), left drag (which by default moves the item) or a double-click (which by default opens MIDI items in the MIDI editor, or displays media item properties for audio items). Some contexts (e.g. Arrange view) also make middle button mouse actions available. You aren't going to learn all of these at once, and some of them you may never need. For example, if you never do any work with MIDI then the various MIDI contexts are unlikely to be important to you. Take the time to identify those which you are likely to use the most and think about how you can improve them. The procedure for customizing REAPER's mouse modifiers is as follows:
- Display the Mouse Modifiers page of REAPER's Preferences Window. 2. Display the Context drop down list and select an
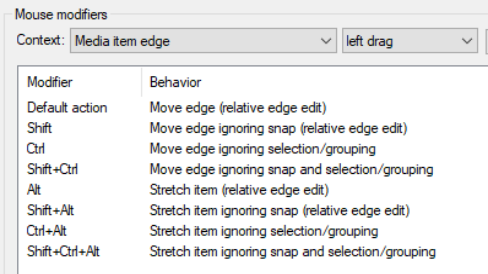
entry from that list. A list of current modifiers for that context is then shown. An example of this is shown here, for Media item edge left drag. 3. In the Modifier column, double click on the item
that you wish to change. A list will be displayed which shows suggested actions that you might wish to assign to that modifier. You now have a number of choices:
✔ Select any item from that list, or ✔ Select No Action to disable that modifier, or ✔ Select the item marked with a bullet to
restore the default action for that modifier, or ✔ For some items only (including double-click items), use Action List … to open the Action List editor so
that you can assign one of REAPER's actions, or one of your own custom actions, to that context. 4. Click on Apply to apply your changes. 5. Repeat steps 1. to 4. as often as needed. When finished, click on OK to close the Preferences window. There is a checkbox at the foot of this window for this context that can be used to Limit edits to source media content for unlooped media items. The Import/Export button can always be used to Restore modifiers to factory defaults in this context. The examples that follow should help you to understand how REAPER's mouse modifiers work and how to use them. Don't be concerned if not all of these mean a lot to you focus on the techniques:
-
Creating empty MIDI items on tracks.
-
Slip editing media items.
-
Adding FX to media items.
-
Toggling mute status of media items.
-
Setting and removing loop points.
That's (intentionally) a fairly mixed bag of activities. All of these are examples of activities that can be made easier and/or faster and/or smarter by modifying REAPER's mouse modifiers.