15.25 Additional Custom Toolbars
REAPER supports up to 32 general and 16 MIDI only additional toolbars that you can set up to suit your particular requirements.
Kind: concept (user-guide-section) Chapter: 15 Customization: Actions, Mouse Modifiers, Menus and More Source: REAPER User Guide v7.70
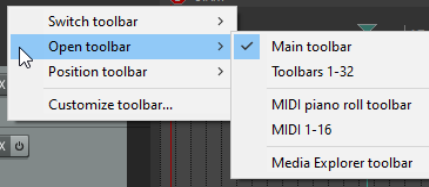
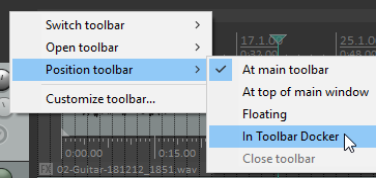
REAPER supports up to 32 general and 16 MIDI only additional toolbars that you can set up to suit your particular requirements. By selecting which commands or actions are added to these toolbars you are able create one click access to your most important commands and actions. To toggle the display of any toolbar, right-click over the empty area of your main toolbar and choose the Open toolbar command, then select a toolbar. You may display as many of these toolbars as you wish. By default, each toolbar contains one icon, labelled “Edit Me”. To change this, you will need to customize the toolbar (see below). Each toolbar window can be dragged, resized and repositioned. It can be kept on top (using the pin symbol). Right click over the empty area of any custom toolbar to again display the menu shown (below). Options are: Switch toolbar: selects and displays a different toolbar. Open toolbar: use this to open another toolbar. Position toolbar: used to dock a toolbar at the main toolbar, at the top of the main window, in the toolbar docker, or to float. Customize toolbars: use this to open the Customize menus/toolbars window to enable you to customize the contents of any of the toolbars. By default, the currently displayed toolbar will be selected for editing. You can add commands to each or any of these toolbars as you wish. To select a different toolbar for editing after opening the Customize menus/toolbars window, display the drop down list from the top left corner of the Customize menus/toolbars window. The following table summarizes the main editing options.
In order to do this ... … you need to do this.
Change the name of any tabbed toolbar
Select toolbar in the Customize Menus/Toolbars window, click on Retitle... then type the new name then click on OK.
Add an action or command to a custom toolbar
Click on Add... to display the Actions List. Select the command or action and click on Select.
To edit a custom toolbar button label
Right click over the item in the customized toolbar panel (left) and choose Text Icon... Type the text then click OK.
To assign an icon instead of text to a custom toolbar button
Right click over the item in the customized toolbar panel (left) and choose Change Icon... Select the required icon from those displayed, then close the Select Toolbar Icon window.
To remove an item from a custom toolbar
Select the item in the Customized Toolbar (left) panel and click on Remove.
To change the order of icons on a custom toolbar
Drag and drop items up or down the list displayed in the customized toolbar (left) panel.
To save a custom toolbar set
Click on the OK button in the Customize Menus/Toolbars window.
To export a custom toolbar set
Use the Export... button and choose Export current menu/toolbar to … Type a name and click on Save.
To import a toolbar set
Use the Import... button, select the file name, click on Open.
To dock/undock the floating toolbar
Right click on floating toolbar, choose Dock floating toolbar then select one of the three options.