21.2 Consolidating and Exporting
You might, for example, want to send your project to a friend to add vocal harmonies to your song.
Kind: concept (user-guide-section) Chapter: 21 Exporting Files, Mixing Down and Rendering Source: REAPER User Guide v7.70
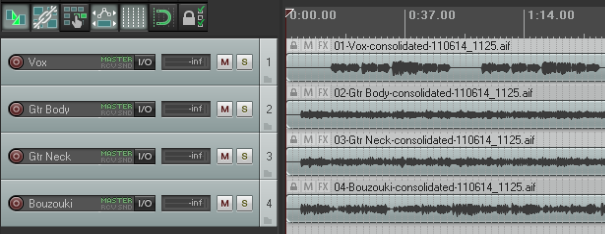
You might, for example, want to send your project to a friend to add vocal harmonies to your song. What if that friend lives a long way away and doesn’t use REAPER? She might use a different DAW, or perhaps she will use a commercial studio. In any case, the project can be consolidated and exported. In the example here, the Vox track is made up of three items. If we sent the six media files to someone else, it would be difficult to line the items up. Consolidate and export creates a new set of audio files, one per track (minus FX, panning, etc.). When inserted in another DAW, each starting at zero time, one per track, then everything will be in the right place for further mixing.

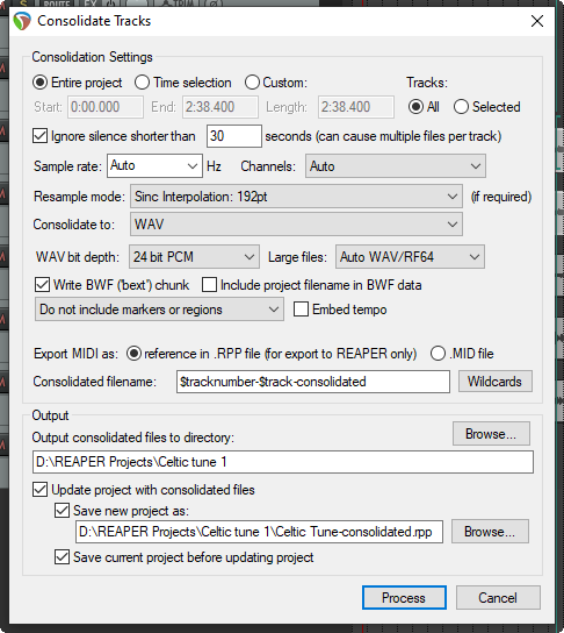
- Depending on what you wish to
consolidate, if necessary make any time selection and/or track selection. 2. From the main menu, choose File,
Consolidate/Export Tracks.
- Choose Entire project or Time
selection or Custom selection, then All or Selected tracks.
4.
Ignore silence is a setting designed
to prevent multiple files per track. In most cases you can leave this at its default value of 30 secs. 5. Decide if you want to have sample
rate and number of channels automatically determined, or whether to specify these yourself. 6. Select a Resample Mode. 7. Specify consolidation format and bit
depth – WAV, AIFF, DDP, FLAC, MP3, OGG Vorbis, OGG Opus, Video LCF or WavPack. In the example shown, WAV has been selected. 8. Select your required specifications for your chosen format. For example, for WAV files you need to select a
bit depth and specify whether you want to use BWF data, include markers and regions, and how to deal with MIDI data. If in doubt, speak to the person to whom you will be sending the consolidated files. 9. Specify your Output directory (where the files will be written to). 10. Specify whether you wish to update your project with the newly consolidated files. 11. Specify a name for the new project file (or accept the default). Click on Process.
Note: Be careful how you use the option to Embed tempo. It adds an ACID tempo tag to the audio file(s). This may be interpreted by any tempo aware application so that the audio is stretched or processed when you do not wish this to happen. Only enable this option if you are certain you want the tempo embedded. Shown here is an example of a project after consolidation, with one media item per track. These four items can be easily imported into any DAW program, with vocal harmonies then added.
Note: To consolidate in MP3 format you need to have the correct free Lame encoder file for your platform and REAPER version. For example, for Windows 10/11 it will be either libmp3lame.dll or lame_enc64.dll. This file is included with the REAPER download. Likewise, for output video rendering you will require an encoder such as Ffmpeg.dll, also included in the download.
When you consolidate media in this way your item settings and properties (e.g. take envelopes, take FX, item pitch adjustment) will be incorporated in the output files, but track based properties (e.g. track FX) will not be. To apply your track FX chain, track envelopes, etc. to your output media, use the Render to File dialog, selecting Stems (selected tracks) from the Source drop down list.