9.1 Creating Loops
Note: Many of the arrange view illustrations used in this chapter use earlier REAPER default themes and color schemes.
Kind: concept (user-guide-section) Chapter: 9 Tempo Based Production, Loops, Markers and Regions Source: REAPER User Guide v7.70
Note: Many of the arrange view illustrations used in this chapter use earlier REAPER default themes and color schemes. The information and instructions, however, are still accurate and correct for REAPER 7.
Any audio, MIDI or click source Item can be looped. Indeed, by default REAPER media items are loop enabled. You can disable this for individual items in the Media Item Properties dialog box, or globally (for MIDI and imported items) on the Project, Item Loop Defaults page of your Preferences. The loop point is defined by the duration of the source media. If you insert an item that is four bars long, it will loop every 4 bars, if it is 8 bars, it will loop every 8 bars, etc. Note that in the following examples, if you are using beats for your timebase, the item must be an exact number of beats in length, or it will not loop in sync. If necessary, adjust the playback rate (Media Properties) while preserving pitch, then glue the item to do this.

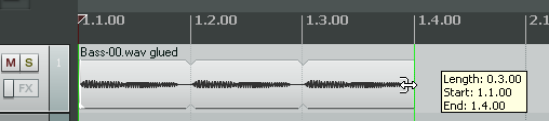
To Loop an entire Item:
- Hover the mouse over the edge of an Item until the Cursor changes to a double-headed arrow (see right). 2. Drag the Cursor to extend the Item. Each loop point will be indicated by a notch in the item edges. 3. The length, start time and end time of the looped item will be displayed as you drag the edge of the loop.