ReaDelay
ReaDelay, as its name implies, is used to add delay to a track or media item.
Kind: concept (effect-summary) Source: REAPER Effects Summary Guide v3.04
ReaDelay, as its name implies, is used to add delay to a track or media item. Its possible uses are many and vary from adding a few milliseconds of simple delay to a thin vocal (to fatten it up a little), to creating an echo effect to add to a timpani or other low frequency percussion instrument (to create an atmosphere of impending tension) to creating a bouncing ping pong effect. This is one effect that more than most really opens up avenues for you to be creative. REAPER's ReaDelay gives you multi-tap options. This means that you can create several discrete pages of delay settings independently of each other apply them all at the same time to to a track or media item. The default screen shows only one tap (labeled “1” above) but you are able to add more if you wish.
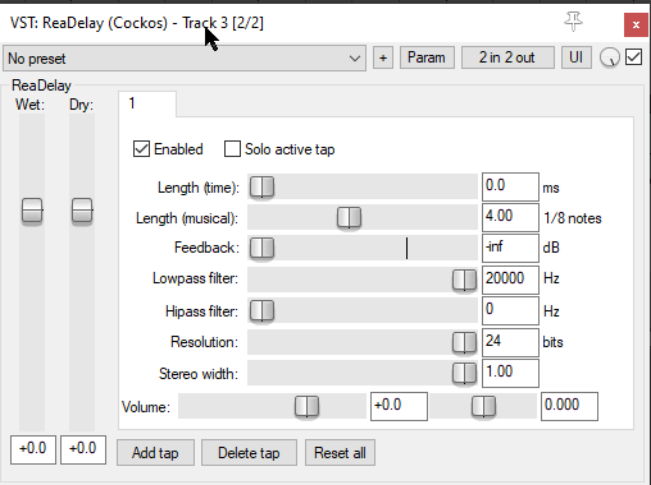
Enabled Toggles enabling/disabling the currently selected delay tap.
Solo active tap Toggles soloing the currently selective tap (settings page). When any one tap is soloed, all other taps will be ignored.
Length (time) / Length (musical) Use one of these settings to specify the length of delay required, either in time (milliseconds) or fractions of a note. It would be unusual to use both of these faders on a single delay tap. The human ear will not normally distinguish a delay setting of less than 7 ms as a discrete sound. Such a setting can therefore be helpful in making a track sound “fatter”.
Feedback Feeding the delay signal back into the original dry signal can help blend the two signals together, thereby possibly making the wet signal less “echoey” and perhaps creating some interesting effects. But beware! Too much feedback can have unpleasant consequences, both in terms of sound quality and your ears!
Lowpass filter Specifies a frequency above which the audio signal passes thru without the delay effect being applied. For example, a low pass setting of 5,000 Hz would ensure that the delay was added only to frequencies below 5,000 Hz.
Highpass filter Specifies a frequency below which the audio signal passes thru without the delay being added. For example, a high pass setting of 10,000 Hz would ensure that the delay was added only to frequencies above 10,000 Hz .
Resolution This fader can be used to reduce the bit resolution of individual taps. In the example shown above, the default setting of 24 bit matches the resolution of the recorded material. Lowering the delay tap bit resolution can emulate the sound of early digital delay effects boxes.
Stereo Width When working with stereo material on a track, bus or folder, the stereo width fader can be used to narrow the stereo image of the delayed signal.
Volume Adjusts the level of volume for the individual delay tap.
Pan (unlabeled) Located immediately to the right of the volume fader, this adjusts the pan setting for this individual delay tap to the left or right.
Add tap Adds another page of delay settings.
Delete tap Removes the current page of delay settings (but you must leave at least one page).
Reset all Resets the FX to its default settings, including restoring the same number of taps as in the default settings.
Wet Determines the output level of the mixed wet signal of all delay taps.
Dry Determines the output level of the original (undelayed) signal, mixed in with the wet signal.
The next section will show you how to use REAPER’s pin connectors to add ReaDelay to a track and then send the wet signal (i.e. the delayed signal) to a different track. This technique can be applied to many plug-ins, including (but by no means limited to) delays, reverbs and choruses . ReaDelay is used purely for the purpose of illustration.